Drilling a hole in the sink for the faucet
How to drill a hole in a ceramic sink for a sink sink sink sink mixer?
Trauma room full of people who thought they didn’t need insurance. And stores are full of sinks that don’t have holes to install a faucet. And no sink that has two holes to install two faucets, one for each hole. That makes sense. Why put two mixers in one sink?
And if you imagine from time to time that you are the only hole in the sink and you feel lonely on the island, limited by its outer, smooth ceramic edges, who will understand it, and to whom you can tell about it, expecting at least to be listened to, not to mention sympathy and understanding?
It seems to me that two holes in the sink for the faucet would be too much, and none would be too little. So today we’re going to talk about how to drill just one hole in the sink. In a ceramic sink that does not have a single hole to install a faucet from the day it was born, if only sinks have such days, birthdays.
Some people don’t understand the importance of having a hole in the sink for a faucet and consider any text that contains a lot of the words “hole” to be nonsense. So, I’ll try to write more simply, without abusing words like “hole” and “sink”.
How to start drilling and what to drill the sink with
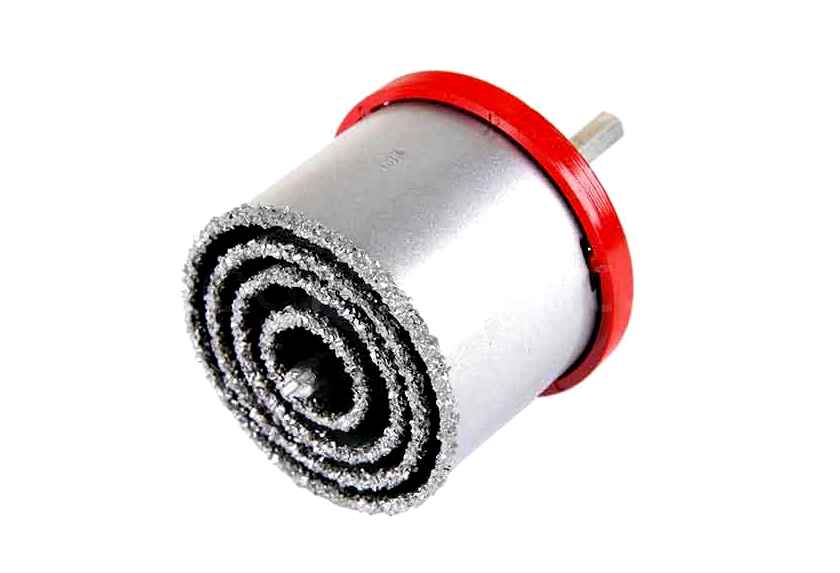
To drill the sink you need a ceramic drill bit and a carbide-tungsten drill bit for cutting round holes, 33 mm in diameter. It’s better to use a peorator than a drill for drilling. And it’s not because the peorator has a stronger kick. We will not use impact at all. The peorator has less speed, but more weight in kg. and wattage. But if you do not have a peorator, then of course take a drill, but lower the speed, otherwise the drill bit will be useless.
The stages of installing the faucet on the sink
The mixer is mounted to the sink before it is mounted to the countertop. It is more convenient and better technologically.
Connection of the faucet to the water supply is carried out after the sink with the installed faucet is installed on the kitchen countertop or cabinet. It is better to assemble the mixer on a comfortable surface.
For assembly you need to prepare the recessed sink itself, the mixer with the fitting kit and the flexible hose. The installation kit is included with the mixer and includes:
This is the most common way of mounting the mixer to the sink, and it can be called a standard.
The important thing is! Faucets differ in the way they are connected to the water supply. Here I show a mixer with a variant of connection through a flexible hose (connection hoses), which are screwed to the mixer separately.
faucets are available with removable connection hoses, which are installed by default. When you buy them, you need to consider that it is impossible to repair such faucets in case of damage to the connection hoses.
Faucets with removable connection hoses, also have a disadvantage. Faucets are sold complete with short hoses. Usually you have to change them out for longer versions, NOT 15 cm, but 30-40 cm. It is more convenient to connect and easier to maintain.
The flexible hose is screwed to the faucet before the faucet is installed. It is not necessary to do any filing under the thread.
To tighten the hose, there is a hexagon socket for a spanner on the end of the hose Tightening should be done with a little effort so as not to crack the gaskets of the hose.
After attaching the supply, we screw in the body of the mixer mounting bushings (if they are included separately, rather than assembled at the factory).
Once the mixer is assembled, it is installed in the sink opening. Do not forget to install the gasket that comes with the mixer between the sink and the faucet. The gasket can be pressed into the mixer body.
At the back of the sink put a special gasket and a washer of the same profile on the mounting bushes. Next, you screw the mixer with nuts to the sink, tightening the nuts until they stop.
the installation of the mixer at the sink is completed
To prevent fixture looseness in time we fix the first nuts with the second ones that are not included into the mixer set (you must buy them beforehand).
The final result of the installation must be a firm hold of the mixer, it must not wobble, and the pipe must be on the mixer.
Installing the faucet on the kitchen sink with your own hands is not associated with great problems. Especially if the connection is made through a flexible pipe. It’s much harder to change the faucet on an installed sink or connect a faucet on a rigid line. About this in the following articles.
Be sure to read the article how to choose the right flexible hose for the faucet, it will be released on March 29. Subscribe to! to get the article in the mail.
Thank you kind man for the tip! The other day made a perfect hole IKEA punching tool.
I have not seen a drill bit on sale in our country, but I do not see any difficulty in drilling stainless steel. Yes it is a little more ductile than normal steel, but a well sharpened drill is unlikely to be a hindrance. I had to drill a hole in steel pipes f40mm for that I bought a bimetal drill bit krasnodar.vseinstrumentiicheskaya-40mm-11-01-062/the hole is not as ideal as with the nail bit, but it still can drill a lot of things)))
I always drill all stainless steel sinks with regular drills.They rarely have holes for a faucet. That’s why I don’t have a punching tool yet.On the contour of the proposed hole at first 2-2,5 mm then either 4 or 5. And a little trim with a file so you don’t damage the flex tube when you install it.
But your way saves time, that’s a fact If you wash them all the time, only with your way
It’s not my way. Ikea also sold such drill bits in the kitchen department! )
What do you drill “stone” sinks with?? They’re made of some kind of resin and powder, as I understand it.
I blunted both the drill bit and the drill bit while I was sawing a hole in one for the faucet! )
But, of course, such a sink is much more beautiful than stainless steel. And probably more practical.
“Your” in the sense of the one you showed.) The punching tool costs about 700 at the store. Rarely needed, but it’s a good way.Often the stone sinks come with a fostner drill.That’s what I use to drill with. Sometimes they’re dumb, though. So it’s worth keeping if you get a sharp one.Sometimes there’s a hole already drilled in the stone sinks. I’ll hammer it in gently and smooth it out a bit with a file.
It’s not my way. Ikea also sold such drill bits in the kitchen department! )
What do you drill “stone” sinks with?? They’re made out of some kind of resin and powder, I guess.
I blunted the drill bit and bit, while sawing a hole in such under the faucet! )
But of course, such a sink is much more beautiful than stainless steel. And probably more practical.
I want to try this and for particle board will work and sink found it on ali
I drilled with this when I didn’t have anything handy! )
Maybe it will work for stone sinks. it’s a stone nozzle after all. )
But for particle board it’s better to use a drill bit for metal or wood.
I am embarrassed to ask if all discs like in the photo are designed for stone and brick? Since they have a solder) a link to the drill bit ru.aliexpress.com/item/dr…harpness/32320233857.I may be wrong of course but I think the chipboard will drill better than the drill bit (which burns chipboard). because of the small tooth pitch.)
You did not say that it is on metal, and I drilled wood chipboard concrete drill bit, and decided that since we were talking about stone shells and the crown should be on the stone. )
Unfortunately, I will not be able to check it. with such a crisis and collapse, I’m unlikely to buy a stone sink.
I’m fixing up a house in the country right now. I took an Ikea steel sink there. I got the biggest one on sale at a bargain price. )
congratulations on your purchase) in the photo shank is not for pea) sometimes I have to drill wood chipboard and stone sinks sometimes and iron sometimes. I am thinking of ways to increase the drilling speed.The step drill, as I understand from the video, is not the way to go. The edge is not flat, but may be useful in other cases) crowns on any need new under the sockets in the wall panels are often drilled, blunt became so I study with soldering, I think they will live longer
Live a long time and go to Ikea !I did not know, however, will take note ))
The worst thing was when we returned the cabinets and sink (unopened) a year and a half after the purchase, when all deadlines had passed. The full price was refunded. 20,000 rubles!
In the Soviet Union such an approach to the customer is unthinkable.
The main thing is not to work in Ikea.For the assembly of the kitchen was waiting for the money more than two months). The customer pays for the prefabrication in Sweden (if I’m not mistaken, they have their headquarters there)
Ikea furniture assembled all myself, especially the kitchen. I do not believe our assemblers! )
As for your situation. the assembly is a contract?
You do not work for Ikea, but for a third-party firm, and this firm already provides services to Ikea?
Most likely the Swedes paid all the deadlines, and our miserable bastards love to squeeze money from working people and twist a couple of months in the bank, feeding them fairy tales, and then return the interest to them.
assembled a lot of different furniture from Ikea.And privately. and from the company. Perhaps this furniture is not so difficult especially except for kitchens.Sometimes you have to adjust the kitchen to the size. Countertops, cabinets. Not everyone has a tool.There are a couple of clients, they only have this furniture.As I understand the firm that hired me is domestic. Provides services for furniture assembly. I think it’s about 8-10% of the client’s fee. Me 4% of the cost of the furniture. Plus, you have to pay for extra work separately.Almost every sneeze had to be written down on paper, I thought everything was serious. Like no more than 3 days to assemble the kitchen, etc.The price for services is printed in such a quality that it feels like a thousandth copy of the original. over, every copy through a photocopy held) NONE in the firm did not dare to reprint the price list) For what the firm takes 50% of the amount is not clear. Do not solve anything. All questions are referred to the customer. And the client “I do not remember, it was bought long ago and not by me, and the one who bought it no longer “And the collector is marginal. Blago all ended well) Why do they send money to Sweden as they told me I do not know. The money was paid and well.
making a hole to install the faucet
Nowadays, there are many models of sinks that have a symmetrical shape. Such sinks are extremely convenient because they can be installed on both the left and right side.
Some models of modern mixer taps: a. a kitchen sink mixer; b. a kitchen sink mixer with a shower screen on a flexible hose.
So that the sink can be installed on either side, in the manufacture of the sink is not made outlet for the mixer.
It is assumed that the hole for the faucet of the required diameter will be made immediately before installing the sanitary ware. On the one hand, it is very convenient, because it is not always possible to pick up a sink with a ready-made outlet due to the differences in parameters.
Single-hole kitchen sink faucet: drawing.
Most pre-installed kitchen sinks have a 32 mm factory outlet, while the faucet can be more than 34 mm in diameter. Nowadays there are variants of sinks without a ready outlet made of both stainless steel and ceramic. For many people to make a hole of the required diameter may seem simply an impossible task, but in this case there is a number of measures that can be taken.
In some points of sale of such sinks it is quite possible to use the services of specialists: they will choose the exit under the faucet of the required diameter, make everything with special tools. But such services are not available everywhere, and the owners of sinks without a mixer tap will have to make it on their own.
It is worth saying right away that you can make a neat hole yourself only in stainless steel, while on a kitchen sink made of granite or ceramic to carry out experiments are fraught, as the material can crack.
Work on the production of outlets for communications in a ceramic sink must be carried out as carefully as possible in order not to spoil the appearance of the sink. If possible, it is necessary to buy tools: for stainless steel sold special cutters for making holes, for ceramics it is best to use drills with diamond coating. To drill a ceramic sanitary ware with an ordinary drill will not work, as the ceramic will simply crack. However, it is quite possible to do and some improvised means, but to act very carefully.
Making a hole for the installation of a faucet
In the present time, there are many models of sinks that have a symmetrical shape. Such sinks are extremely convenient, because they can be installed both on the left and on the right side.
Some modern models of faucets: a. a kitchen sink faucet; b. a kitchen sink faucet with a shower screen on a flexible hose.
It is assumed that the hole for the faucet of the required diameter will be made immediately before installing the plumbing. On the one hand, it is very convenient, because it is not always possible to pick up a sink with a ready-made outlet due to differences in parameters.
Single-hole kitchen sink faucet: drawing.
On most ready-to-install kitchen sinks, the factory outlet is 32 mm, while the faucet diameter can be more than 34 mm. Options for sinks without a pre-fabricated outlet are now available in both stainless steel and ceramic. For many people to make a hole of the required diameter may seem simply an impossible task, but in this case there are a number of measures that can be taken.
In some points of sale of such sinks it is quite possible to use the services of specialists: they will pick up the output under the mixer of the required diameter, do everything with the help of special tools. But such services are not available everywhere, and the owners of sinks without a ready-made outlet under the mixer will have to make it themselves.
It is worth saying right away that you can make a neat hole yourself only in stainless steel, while on a kitchen sink made of granite or ceramic to carry out experiments are fraught with danger, since the material can crack.
Work on the manufacture of outlets for communications in a ceramic sink should be carried out as carefully as possible in order not to spoil the appearance of the sink. If possible, you need to buy tools: for stainless steel sold special cutters for making holes, for ceramics it is best to use drills with diamond coating. Drill a ceramic sanitary ware with an ordinary drill will not work, as the ceramic will simply crack. However, it is quite possible to get by with some improvised means, but you need to act very carefully.
What should be the diameter of the hole under the faucet
If we focus on the existing standard, it should be noted that the siphons, which are installed under the sink, in diameter are rarely more than thirty-five millimeters. If the sink already has a hole for the faucet, then, most likely, all questions will disappear by themselves, because it should fit.
But some companies have models of sinks, usually made of ceramics, which have no holes for the faucet at all. The fact is that there are faucets that are mounted either on the curb or on the wall above the sink. This raises the question of how to drill the hole easier. However, if you have a drill, the right drill bits, and a minimum work skill, it will not be an insoluble problem.
If you use a drill bit that has a diamond core, for example, with the same thirty-five millimeter diameter, you can easily make the required hole. In this case, you will not need to somehow cool the drill, pour water. With modern equipment, there is no need for any of this. With such a drill, you will be able to make a perfectly flat hole, without any chips.
Once the hole is ready, you need to think about sealing. On the sink will need to lay a gasket, and when the faucet will be installed in its place, it will not be out of place to treat the joints with silicone sealant. This will exclude any possible leakage.
How to drill a hole in an artificial stone sink
Sinks from artificial stone, as a rule, are sold as one piece, that is, without made holes for a mixer. Some companies offer this service, but sometimes the drill and drill bit have to be taken in your own hands. In such a case, it is extremely important to know exactly how to drill, and what speeds to set on the drill. On these and other nuances will tell the master plumber.
How to work with different types of artificial stone
There is no clear definition of artificial stone, and it includes several types of material at once:
Porcelain stoneware. the toughest of all, unaffected by high and low temperatures as well as minor mechanical damage. ordinary drill will not “take it”: only a drill bit (Forstner mill) or a diamond tipped drill bit (or other carbide) will cope with its density.
Pay attention! During the work it is necessary periodically to “cool down” the surface with water and the drill should work on low speed. 250-350 rpm
Acrylic. the easiest material to work with, since its density is minimal compared with other materials. Common drill bits for metal or wood can be used with it, e.g. Feather type or the same Forstner cutter. Standard 35 mm hole for a faucet must be drilled at low to medium speed (the material is very malleable indeed, and you can even cut it with a jigsaw, but it is difficult to achieve a neat result with it). A large amount of “plastic” chips and a characteristic smell. The consequence of the high content of plastic.Agglomerate. Material with medium density. It is not as difficult to work with as porcelain, but requires more care than acrylic. In order to drill holes in it, it is best to take the same cutters, as in the case of porcelain.Order of workSo, having an idea of what material we have in our hands, and having the necessary tools, we can proceed directly to drilling holes in the sink:
Two types of sinks
Two types of kitchen sinks are the most popular right now:
Both with stainless steel and porcelain stoneware the manufacturers do not rush with drilling holes, leaving these little details to the vendors.
For your information! Sink sales stores can arrange to drill holes. The price of manipulation is affordable, you specify the diameter and location, pay and get a finished product with places for faucets, mixers.
The problem is solved, the topic can be closed, but there are situations that fundamentally change the original plans. over, the desire to do everything with their own hands, and the pleasure that you get from a well-done work is incomparable.
Working on your own
Simple things can turn the world upside down. The initial desire to install the faucet on the right side in the corner, will be negated if your spouse is left-handed.
For your information! In the kitchen, as nowhere else, great importance is given to beauty, functionality, also ergonomics. It is very uncomfortable for left-handed people to open the faucet, which is on the right, with their left hand. Water gets on your hand.
We recommend that you first place the sink in place, take a closer look, and then decide and choose places for nests. You have chosen to do the work yourself?
- All work with the product before installing it on a stationary place, with these simple actions you prevent deformation of the object and premature deterioration;
- Place the sink horizontally on a wooden base. Drill a small hole with a metal drill bit enough 5-6 mm to define with the center of the circle;
Tip! If you are using punches and a hammer, the above manipulation is not necessary.
- And then there are three ways to choose from:
- Hammer and punch. Here everything is simple: you should punch the fixed bowl with the help of special nozzles manually, the nozzle is initially selected under the diameter of the hole in the sink under the faucet or a tap;
- The special design drill bit. This is a mechanical toy that uses the extrusion method of. This punch consists of a threaded pin and two nozzles, a tap and a pressing washer with a wrench head. Putting the pin in the hole on the outside, screwing a washer with a head, you use a wrench to tighten-press. The result of this manipulation is a hole in the stainless steel sink for the faucet;
- The third way is a special drill called a carrot. The name has stuck so much that even on the packaging of the product it is never called anything but a carrot-drill. The drill is represented by a cone, with a cutting edge diameter of 6 to 32 and even 38 mm. We won’t describe the principle of using a drill bit, everything is clear.
In the piggy bank! Sometimes the choice of the consumer stops at the faucets with tumblers of large diameter. Siphon for a sink with a large hole requires a large seating socket. Then there are several ways out: the first is to order the hole in a store, and the second is to drill a few holes of smaller diameter around the circumference. Then simply join them together by removing the inner circle with a chisel. But you need to be very precise and accurate.
How to drill a hole in a stainless steel sink. we have disassembled, move on to the stones.
stone and under stone
Much more interesting is the topic of drilling seatings in stone sinks.
Note! the simple manipulation. working with a drill bit. is not too easy in practice. A drill bit with a pobedite insert is contraindicated for this work, it does not drill so much as shear and flatten the material. Not bad showed itself drills for metal, but need a low speed drill itself (ideally it is better to use a hand drill). With high revolutions the edges are melted.
- The material can heat up quickly while drilling, but this is difficult to control. Drilling a hole in the sink made of artificial stone is better to conduct a thin drill. We work on the perimeter of the entire future nest;
- The partitions between the holes are recommended to “pass” in two ways:
- Notch the strokes with an electric soldering iron, followed by knocking out the plug with a hammer;
- The jigsaw is good for sawing the material. Although this process is longer, but the edge is the most even;
- Grind the circumference of the hole with a round abrasive nozzle for the entire circumference. If you do not have one in the household, use a regular round file.
Diamond-coated crowns are rare guests in the household.
To the digest! You can also use a diamond drill bit if you have one with you.
Inform! In some bowls there are special marks. These are the places where you can hit the hole with a hammer. This must be done with care, the marks themselves are marked with paper stickers that can slip when transported. Hitting a different point can only destroy the material.
A qualitatively carried out work is a guarantee of durability.
Drilling holes in ceramic tile
There are two options for making holes in ceramic tiles:
A simple and cheap way to cut a hole, both round and in different configurations, using a metal hacksaw and a metal string with a diamond coating.
- Draw a felt-tip pen on the tile a circle of desired diameter.
- Use a ceramic drill bit to make the initial hole inside the circle, insert a string.
- Assemble the hacksaw, pull the string, and cut a circle of the desired diameter.
Special drill bits are used for drilling holes in tile and glass. They look like a sharpened spade. Recommended operating mode for them at low speed, up to 800 rpm.
Particular attention should be paid to the radial run-out of the electric drill chuck, which occurs with increased wear of the bearing.
If the drill bit beats too hard, the ceramic tile can split.
You can also use a pobedite drill bit for concrete and a peorator in drill mode.
In order to cut a hole in the ceramic tile for the mixer of the required diameter drill a hole with a drill bit 3. 5 mm in a circle. After that you have to remove the lintels.
To level the surface it is necessary to remove the remaining jagged edges with a tile cutter and adjust the diameter to the desired size. After gluing the tiles on the pipe is installed a decorative reflector, which will cover the uneven edges.
Holes in sinks
How to drill a hole in a “stone” sink? We’ve said before, we’ll say it again: a “stone” sink is a sink made of quartz (may also be called granite), or marble, or kitchen ceramics, or whatever was underfoot and got in the way
all go)). Since we know absolutely nothing about the last type of material, and it is not recommended by the manufacturer to drill ceramic kitchen sinks, we leave these two mysterious materials out of our enlightenment. It’s considered luck that marble and granite are perfectly drillable with the same cutter. With a diamond cutter (t.е. with diamond dust on the perimeter) with a drill guide. It is best to drill at speeds up to 1000 rpm., which corresponds to half the pull of the trigger of the drill. You can use water cooling for “wet” drilling, but in our experience it is not necessary. Which side to start drilling the sink from? We usually drill marble sinks from the front to the back, and granite. on the contrary, from the back to the front, although this point is not principal, in our opinion it is easier to get flat hole. You don’t have to worry about small chips on the edge of the freshly drilled hole: In 99,99% of cases the installation area of the kitchen mixer is larger than 50 mm and easily bridges all the imperfections. Worry about the accuracy and smoothness of movements in the process. Even specialists with a black belt in drilling sometimes make annoying mistakes. For example, you should not apply excessive pressure to the drill, you can lose your balance at the moment when under the cutter ends the sink, once so cracked the sink one “mature master”, while doing a dive head first. Also do not take the drill out of the hole without waiting for it to stop, you have already guessed what can happen. What drill bit to choose for holes in the sink? You need a cutter with a diameter of 35 mm for the holes for the mixer. For the holes for the dispenser. from 30 mm to 35 mm (depending on model) For the holes for the drinking water tap from 20 mm to 35 mm (also depends on model) How to make a hole for the faucet in a steel sink?
Especially for making holes in stainless steel sinks, there is a special water pipe puncher available in all recognized recognized dealers. Not very complicated, but quite expensive heavy gizmo made of special tool steel, which is able to cut through a layer of stainless steel up to 1 mm. Sometimes in tool stores or IKEA you can find a special cutter, pushing through the sink, clinking through a regular drill hole 10 mm. Some craftsmen have told of the successful use of the “Fostner drill” on stainless steel at low speeds. But if all this special equipment is not available to you and you need to put the tap on the sink urgently, you can very accurately mark with a marker on the sink those projections where the hoses and the stud are included in the tap and make three holes with an ordinary drill of 10-15 mm. through metal (one for each of the hoses and the mounting stud). By the way, you will get a more rigid connection than with the usual extrusion of a circle of 35 mm. It is important that your faucet is mounted with a stud and not with a wide nut, otherwise this method will not work. For faucets on a nut, there is the loudest, longest and most boring way to install: tapping the contour 32-33 mm and drilling holes with a thin drill bit. Then bite the jumpers and sharpen the burrs with a file. Also, we want to at least encourage your curiosity and patience in reading our article, and offer to drill a hole in your metal sink bought anywhere in our store. Completely free of charge on any sink up to 1 mm thick. Password: “faucet socket.”.
Here you can watch a short video of us drilling a hole in a quartz sink for a Store Client
How to make a hole for a faucet in a stainless steel sink?
There are several proven ways to cut a hole in a sink without a faucet hole made of stainless steel. Do not make such a hole in an existing sanitary fixture, as it might crack because it is supported on the countertop. If available, rent or purchase a special cutter to make the job easier.
Instructions for making the hole look like this
- Before you begin, turn the sink upside down so that all sides of it touch the table surface.
- Create a circle of masking tape of the desired shape and size, place it in the desired location, trace around it with a marker.
- Mark the center to make it easier to make the hole with the core punch.
- With the point of the punch in the center of the circle made of masking tape, using smooth tapping movements, punch the starting hole.
- Ream the pilot hole with a round file to the dimensions you planned earlier.
- Sand the edges of the file carefully to achieve the desired exit diameter.
- Apply sealant to the edges of the fresh saw cut.
- You can install the sink.
How to avoid mistakes
Suppose you have decided to make a hole with a drill and cutter.
Often professionals make a hole when the sink is already installed in the countertop. This solution has only one advantage. the edge on the front side will be flat. And it has many more disadvantages: you can scratch the stone, damage the sink, chipping the edge and so on.
That’s why it’s better to drill from the back. But there is a chance that the hole from the outside will have an uneven appearance. However, in this place there will be a faucet, which will cover the uneven edge. There is no risk of ruining the face of the sink.
There are two principally different methods of work. The first involves working with a drill, and the second. beating out the loose casting plugs provided by the design. Let’s consider each of them in order.
Making a hole in an artificial stone sink using a drill step by step:
Some artificial stone sinks have molded plugs that are knocked out during installation. They are usually marked with a color on the front. First of all, the sink is placed in its place in the countertop, but it is not fixed.
Then you need to find the right tool and hit the plugs with a hammer. For this role will be suitable punch with a diameter of 8 mm, but not a screwdriver. Only knock out the sink from above, i.e. from the front side. Smooth out any rough edges of the hole with a rasp.
This way you can make a hole for the faucet.
- The center is marked and a circle is drawn.
- Using a drill along the length of the circle is drilled holes, the distance between which is 4 mm.
- To prevent the sink from cracking as it is knocked out, hold it firmly in place.
If there is a need to increase the radius of the hole, you need to draw another circle of the required size. With the same face side along the circumference we make cuts at a distance of 4 mm. Use a puncher or chisel to remove unnecessary parts.
Nowadays, quite often there is a question of how to drill a hole in a granite sink. It is connected with the fact that in most cases, buying a specified sanitary ware, it lacks mounting holes needed to install a mixer or flush switch.
Of course, the easiest option would be to help professionals, although by following the basic recommendations, this procedure can be performed by yourself.