How to cut ceramic tiles without a tile cutter
How to cut tiles with a handheld tile cutter
Facing work with tiles and porcelain tiles involves the use of various kinds of devices, which in construction stores are presented today in a wide range. Among them are mandatory tools to perform the cutting of factory blanks. Consider how to cut tiles with a manual tile cutter. Let’s get acquainted with the recommendations of craftsmen on the selection and maintenance of devices, so that they serve for a long time.
The structure of a hand-held tool
To understand how to use the tool, it is necessary to find out how it works. For cutting tiles, manual tile cutters have a common device. Here the main structural elements are:
It is a solid metal base on which all the parts are placed. On it the facing material is laid, so among the main criteria for selecting the device are the evenness of the support and the size according to the format of the tiles.
Additionally, it is worth paying attention to anti-slip pads. On one of the sides there is additionally a non-erasable scale and a small overhang, which allows you to break the ceramic sample along the cutting line.
They are represented by two parallel tubes with smooth outer walls. In more expensive versions, they are replaced by an I-beam. Their function is to hold the working mechanism in the desired position for the operator, to provide the possibility of exerting some kind of pressure on the tile. Also the guides are used to move this fixture.
Rigid tile cutter element to cut tiles by hand. The cutting wheel, the lever and the special foot for breaking the tiling material are fixed on it.
The platform, frame elements under the guides, as a rule, are made of cast steel, as their quality determines the reliability and durability of the tool. The carriage and cutting element need to be even stronger, so an alloy with m tungsten and cobalt is used for production here. To prevent the platform from sliding on the floor, rubber pads are fixed on the back side.
To use such a manual tile cutter can both a professional and a novice master. In addition to this advantage of the master noted other advantages:
- silent operation;
- simplicity of the device;
- mobility;
- compactness
- low weight
- environmental friendliness;
- low cost.
However, there are also disadvantages. Here it is difficult to form pieces with a width of less than 10 mm, the edge at the break line turns out sharp with small irregularities.
For large areas under facing and for cutting thick porcelain tiles, masters prefer to choose electric analogues. Also worth highlighting here is the high percentage of getting a poor quality cut. And for beginners, tiles often break not along the intended line, which can only be straight.
Recommendations for the choice of device
Using the tile cutter properly is not enough to obtain the desired results. It is also necessary that the tool is of high quality. When choosing, experts recommend paying attention to the following points:
- The rigidity of the platform and frame. The design must be reliable, without wobbling, creaking. The lack of vibration and flexibility of the monolithic device is a guarantee of quality and long life of the tile cutter. The same applies to the lever.
- Length of metal base. The shorter models are considered only for one-off jobs or when the home workshop is equipped with additional compact tools.
- The smooth stroke of the carriage. Here the best solution is considered a tool that is equipped with bearings.
Among other things, additional parts can be useful. For example, the protractor can simplify the process of cutting tiles at a specific angle. Additional carriage with a crown makes it easier to form holes in the right place. There are enhancements to increase the support area under the tiles, fixators.
Tile cutting methods
There are special appliances for cutting tiles. However, at home you can cut tiles without a tile cutter. You can use devices for one-time work, others will cope with tiling on an industrial scale. And also distinguish the devices depending on the types of tiles.
Cutting ceramic with an angle grinder
This angle grinder can cut both ceramic and tile at home. The tool in skilled hands will make not only a straight line for the trimmer, but also a shaped. To begin with, it is necessary to prepare:
- Tile.
- Angle grinder or angle grinder.
- Cutting and grinding discs.
- Protective equipment. Mask or glasses are needed by all means, and a respirator and overalls are put on as necessary.
- Vise or clamps.
Use a pointed object to make a preliminary marking. An indelible marker can be used. Lines drawn with a simple felt-tip pen will rub off the mirror surface.
On the table, where the planned production of cutting tiles, you need to lay a piece of plywood or other material so as not to spoil the surface.
For shallow cuts, you can not hold the tile. Its mass and the friction force of its underside with the table is enough to keep it in place. For more serious recesses, the help of a partner may be required if the tile cannot be secured with the foot.
Curvilinear cuts will require fixing tiles in a vise, it must be shifted on both sides of a soft cloth or cardboard to avoid scratches.
In order to make a quality fit, it is necessary to:
- To deepen the cut step by step, cutting 2 to 3 millimeters deeper in one pass.
- Make small cuts to the full thickness at once.
- In order to prevent the disc from accidentally touching the front surface, it is recommended to make a marking on both sides. Then make one solid cut on the glossy part, and finish with the inside.
It is better to make shaped edges with an angle grinder, and straight edges with another, simpler tool. This avoids the cost of diamond blades and the dust that is raised when working in this way.
Jigsaw cutting
If you do not have at hand an angle grinder, then there may be another electric tool. When speed is not important, you can use and ordinary jigsaw with a blade for work on the stone. Cutting tiles with this tool is no different than cutting any other material. Only a special saw and a preliminary soaking of the tile will be required.
The jigsaw is not effective for thick tiles. It is good for wall covering and cutting out pieces with a large radius of curvature.
Glass cutter or any pointed object
This is another way to cut tiles without a tile cutter. Such a tool works only on tiles and in a straight line. There is also a restriction on the width of the cut part. not less than 20 millimeters. The tool itself or a similar device will be required. It uses diamond or pobedite drills. Sometimes you can use a good utility knife.
The ruler, which will be made by making the cut, it is necessary metal, as the wooden one can be spoiled if the knife is torn from the cutting line.
The cut should be applied slowly, carefully. Special attention should be paid to initial and final pressure on the tool. It is usually insufficient at these points. If the edges are not cut well, the fracture in these places will be uneven.
In order to cut ceramic tiles at home, you can use improvised means. Use a drill or knife to follow the path of the tile several times, until the top layer of the tile is cut through. The number of starts depends on the hardness of the tool.
The notched tile can be split in several ways:
-
Taking the tile from both sides along both edges of the notch, clearly, from a distance of 10-15 centimeters hit the edge of the table. The corner itself must be straight and rigid. Be careful not to hit the surface with the palm of your hand.
- You can put a flat bar under the entire length of the tile in the notch line. It should protrude a few centimeters beyond the edges. You need to press sharply on both edges with both hands. If the length of a piece of tile is large, carry out this operation in several steps.
- For breaking in clamping devices, the tile should be wrapped in cardboard and clamped between the jaws along the line of breaking. You can make a homemade clamp from two metal corners or wooden bars, fastened with bolts or pins.
Methods of drilling holes
The process begins with the selection of drills or crowns of arbitrary diameter. Any drilling tool is suitable, either electric or manual. For drills, it is desirable to have a speed control. This is important for the safety of the cutting accessories, because at high speeds the tips quickly shrink. Also in this case the probability of chipping of enamel increases.
The holes are made using special sharp-angled drill bits. However, they have a high cost. But it is possible to drill through the surface of any hardness, and the life of such a tool is long. The use of inexpensive lance drills on tiles is suitable for occasional, small amount of work. One tool is enough for up to two dozen holes if used on tile. Pobedite bits should only be used as a last resort.
For large round openings, you can use a crown with spraying or a ballerina.
Handheld tile cutter
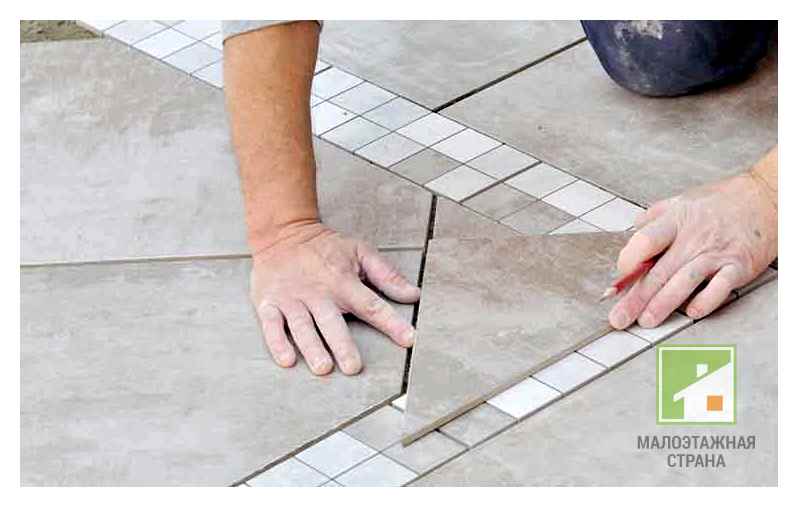
This tool allows you to cut tiles in a straight line or diagonally with a cutting width of 5 millimeters or more. It can be used to cut floor tiles and porcelain tiles. It consists of a base and a carriage with a diamond blade. a wheel that slides on the skids. For greater depth of cut, its diameter is larger than that of a glass cutter. The blade can be replaced as it wears. When selecting a tool, it is advisable to buy a mechanism with bearings to ensure smooth operation of the cut-off mechanism.
To break off the cut strip, a flat metal strip is attached to the base along the edge, and there is a small T-shaped lever behind the cutting blade. It is he who presses on the tile after the cut.
Begin the tile cut by aligning the material on the base along the marked line. Then they are firmly clamped. The cutter is moved by hand, making a single cut. Then the tile is split into parts by pressing on the handle. At such a method sometimes there are small chips, which are masked with grout.
Cutting tiles with the glass cutter
You can cut the tile with a glass cutter. And it is possible to cut tiles with this tool. For the cut, you will only need to make a notch a couple of millimeters deep on the outer part, which is covered with glaze. The glass cutter is held over the surface with a metal ruler.
The cutting process itself is carried out by a sharp light tap on a wooden corner from a distance of about 20 cm. The tile is taken in two hands along the line of the marking and sharply struck against the protruding corner.
You can use pobedite drill bit instead of glass cutter.
You can only get an even cut with this method, and attempts to make a shaped divide or a hole in the tile, most likely, will turn out to be a split of the building material.
Separating tiles with pliers
If you do not want to get a neat line for the separation trimmer you can use pliers or wire cutters. This method is very simple: starting from the edge, you need to break off pieces of material until the desired tile size is obtained. The method is not neat. It often happens that a large piece of the necessary part breaks off with a tool. However, in the absence of another method, you can get by with this one.
All of the described methods of cutting tiles are quite effective for a single use. And yet, when for professional use in frequent repairs of premises, it is better to buy a traditional tile cutter.
Popular angle grinder
The advantages of cutting with an angle grinder are quick cutting and precise cutting. Also, an angle grinder can handle even dense porcelain tile and floor tile. In this respect, the tile cutter is inferior to the angle grinder, because when working with floor tiles, the wheel quickly wears out and needs to be replaced.
The angle grinder will be able to cut a thin strip, while the tile cutter can only handle strips over 2 cm wide.
- Without dust and noise can not do without, which does not allow you to do the work in certain conditions;
- For a quality cut on the angle grinder need to install a disc with a diamond coating. And you also need to buy one.
Cutting technology
To reduce the risk of injury and speed up the work process, you need to prepare the workplace and think everything through in advance.
- Prepare your workspace. The tile must be firmly fixed or held while cutting, so it does not crack.
- Make a mark on the face of the tile. An ordinary pencil on the glaze will not write, use a marker.
- Make sure that the angle grinder is in good condition: the diamond disc is firmly fixed and the protective cap prevents the disc from coming loose while you are working.
- Don’t forget your personal protection gear: wear safety glasses and a respirator. A small piece can get in the eye, so wear safety glasses. But working with gloves is dangerous: if they are torn, a piece of them can get caught in the rotating element. This could lead to an accident.
- Don’t forget to ventilate the room so as not to work in dust.
Cutting process
.
Afterwards you can correct the cut with wire cutters or sandpaper. Remember: Ceramics can be sharp. Wear gloves when working and remove chips and burrs.
How to cut tiles
The following methods are mostly suitable for cutting tile in the home. But also applicable or limitedly applicable to other types of tile. You can cut tiles without a tile cutter in the following ways:
Angle grinder (angle grinder)
Generally speaking, it’s a universal tool. As in the past masters could cut down a house with a single axe, so now with a single angle grinder can cut out anything. The author has witnessed how to cut an even circular hole with a diameter of 5 cm.
Please note! The method is suitable for straight, shaped types and, with minimal tooling skills, for curved lines of any configuration.
- angle grinder. Any power and any kind;
- A cutting wheel (stone or diamond);
- Protective helmet or goggles (mandatory);
- Protective fully covered suit and gloves (recommended);
- Respirator (recommended);
- Clamp. Optional in some cases (clamp or vice).
Pre-mark the tile, preferably with scratching the line with any sharp tool. As a last resort, it is allowed to draw a line with a construction marker. Doing so generates a lot of dust and can wipe out the marked lines when you remove them.
Small straight cuts along the edges of the tile can be made by laying the tile on a flat surface on a table or on the floor. First cut the surface for a few millimeters. With such an operation, the own gravity of the tile and the friction force is enough to keep the product in place. For deeper cuts you can additionally step on the edge or hold an assistant. When making curved cuts, it is better to clamp the workpiece to the table top or clamp it in a vice, putting pieces of cardboard or thick cloth under the jaws beforehand.
Tip! Lay a piece of plywood under the product to avoid damaging the surface of the table or the floor.
- On the outer edge, the marks are repeated several times along the entire length. In one pass, they deepen up to 3 mm. Repeat the operation until the result is achieved;
- For small sections, up to 2 cm in length, at once for the entire thickness;
- The line is marked on both sides. Surface cut (up to 3 mm) is made on the front side. Then cut backwards (up to 3 mm per pass) until the target is reached. This method avoids accidental damage to the face with the cutting tool.
Recommended for difficult cuts: on edges or curved cuts. The fact that with this method there is a lot of dust, cutting blade consumption, time and labor costs. The conventional straight trimmer line can be cut in much simpler ways.
Jigsaw
If you do not have a tile cutter or angle grinder, an electric jigsaw may be available. The tool is underestimated by many people!
Note! A hand-held jigsaw with masonry saw can be used in the same way. But the cutting speed will be much slower.
- Jigsaw. Any power;
- Stone saw;
- Safety glasses (recommended).
To be sawn in the usual way. Sawing too rounded cuts is problematic, the saw gets stuck. Not thick (wall) tiles can be sawn well. It is very difficult to cut porcelain floortiles in this way. It is suggested that you soak the material beforehand to lighten it a little.
Recommended when you need to cut curved sections with large radii of curvature.
Glass cutter or any pointed tool
Only tiles can be cut with this method. And only in a straight line. Another limitation. the pieces must not be less than 2 cm wide.
- Glass cutter. Any tool with a sharp cutting edge can be used instead of a glass cutter. The cutting tool should preferably be made of hard materials: diamond, beater, etc.д. Examples of cutting tools: drills, lance bits, utility knife, etc;
- A metal ruler or any straight metal rail. In extreme cases, of any material. But then you need to be very careful scratching the line for the trimmer cut, because you can cut through the ruler and the scratch will go sideways on the tile.
In order to get a sharp cut without chipping and deviation to the side the scratch needs to be applied accurately. It is enough to scratch the upper, glossy layer.
Tip! Pay attention to the beginning and the end of the scratch, when making the scratch. Often at the very beginning and at the very end, the scratch is not deep enough. This is due to the lack of pressure and psychology. At the very beginning we only try it on and the pressure is low. At the very end, there is acceleration and the risk is “blurred. This can cause the cut to go sideways in these places.
To get a deep scratch, it is necessary to make several passes with a knife, when applying the risk.
The scratch effect depends on the hardness and sharpness of the tool used. If the tool is hard enough and sharpened (glass cutter with a sharp roller, lance-shaped sharpened pobedite drill bit, etc.), use a drill bit.д.), then one pass with a good force is enough. If the tool is blunt or made of soft material (utility knife), it will require several passes. Eventually the groove should be deeper than the glossy layer.
- against a straight sharp corner. Grasp the tile with both hands on different sides of the risk. Apply a sharp blow from a distance of 5.10 cm against the corner on the back side of the product. Before doing this, aim well so that the impact is as accurate as possible on the breaking point. The angle can be anything, as long as it is sharp and hard (metal angle, wooden bar). It is desirable for convenience, so that the angle is raised above the surface of about 10 centimeters. Otherwise, it’s possible to hit the surface with your hand, the impact will go to the side and the tile will break not along the groove;
- Against a hard edge. The tile is laid on the long solid rod with the back side, aligned on it according to the place of the risk. Then sharply pressed on both sides with two hands. The rod can be any. flat, with a diameter of about 8 to 15 mm (drill, round pencil, etc.).д.). Preferably, the length should be at least 2/3 of the break length. You can break out parts, not through the entire length of the tile;
- Between the clamps. The method is suitable for breaking off through the entire tile, and for breaking out large parts. Approaches are different, but the essence is the same. Fix the product between two clamps at the breaking point. It can be two bars or thick plywood. You can make a small machine: two sheets of plywood fastened at one end with self-tapping screws, the tile is placed inside, with an effort to push them apart. The main thing is to ensure that there are even, sharp edges and the accuracy of installation of the material on the line for trimmer risks. After installation, clamp the construction with our own weight and press the projecting edge firmly.
How to make a rounding
Sometimes prepare tiles for laying around pipes or plumbing. Then the question arises. how and what you can cut a tile without using a tile cutter.
Processing is carried out in several ways:
How to get by with just pliers? For this purpose, they draw a line for the trimmer. Facilitate the task by scratching it with a nail. Then take the tool and in small pieces begin to break off unwanted material. The best way to do this is with cutters with carbide clamps.
Inconvenient areas and shaped notches are made with pliers
As for the drill, here are the usual drills for contour sketching, and then nakramivayut surplus with the same wire cutters. A more efficient way to make holes of any diameter is to use special nozzles: feather, ballerina, crown, etc. д.
Waterjet cutting
If you have extensive work and need to cut a solid ceramic floor tiles, but do not have angle grinder or tile cutter, it is better to use the services of companies involved in sawing building materials. The best option. waterjet cutting.
With the help of this method, even the most complex shaped elements can be cut with your own hands at home. The essence is that on the face of the tile is fed at a high pressure thin stream of water, mixed with the finest solid abrasive particles, such as sand. Computerized process control allows you to work with even the most complex patterns.
In this article we considered several ways how you can cut tiles at home without a tile cutter. Each method is good in its own way. The choice of a particular alternative method depends on the amount of work with tiles and skills of the master. With the help of these tools do without the purchase of a special tile cutter.
Particular attention should be paid to safety when working with the “angle grinder
If you want to make holes and semicircular cutting lines at home, use a drill with special attachments, wire cutters with carbide clamps.
To make holes in the tiles use a special attachment to the drill
The peculiarity of working with tongs is to “bite off” fragments of ceramic along a pre-drawn contour. It should be remembered that only small pieces should be separated. In any case, after such procedures it is important to make grinding.
Tools and cutting methods used
Not everyone in the household has the necessary tools that may be required for cutting ceramic or glazed tiles. Therefore, it is often necessary to cope with improvised equipment. In this section we propose to get acquainted with the details and methods that will come in handy in each individual case.
Using a glass cutter
The glass cutter is a simple tool at hand. They try to use it only if it is necessary to cut a thin tile. It is used only for straight cuts, especially for those who have no skills in such matters. To realize a correct cut, follow the step-by-step instructions:
- Take a metal thin bar will do (a long ruler will also do), put it at the intended cutting line.
- Using a glass cutter, scratch through the glaze of the tile, performing an equal amount of pressure along the entire length of the line.
- Be sure to pay attention to the beginning and the end of the scratch. They should not be weakly pronounced, as there is a risk of the cut to the side along the edges.
After drawing a fine line of marking, you can begin to divide the building material into fragments. For this purpose, we offer a few simple options:
- with the use of an even, sharp angle. Ideally if it is a vertical or horizontal metal corner or a wooden bar of sufficient rigidity. Before striking, grasp the tile by two opposite parts from the cut line. Aim to hit a line on the back side as closely as possible. Then tap once with sufficient force. Choose a corner so that it rose above the surface at 10-15 cm, this will prevent the hand from the surface, which may be a beveled cut;
- using a solid rod. In its role can be a sturdy pencil, reinforced rod, whose diameter is not less than 8-15 mm. Also the length must be long enough, so that the full length can be broken at once. Place the tile backside down on the bar and tap both sides of the cut line with both hands at the same time;
- placing it between the clamps. Secure the tile between the two clamps at the break point. For example, two wooden blocks or small pieces of sturdy plywood can be used as braces. Ensure that the cut line has a perfectly flat and thin edge. On one side, fasten the two bars with self-tapping screws, and then place the tile between them with a force. Then additionally clamp the construction under the pressure of your own weight and make a sharp blow on the protruding section.
All of the above options for breaks and notches with glass cutters are only applicable to tile wall tiles. For the fragmentation of floor porcelain tile, the first method will be unrealizable, as the finishing material is thicker and does not lend itself to such a method of division.
Cut with an angle grinder
Angle grinder has long been considered a universal tool, so it is often used for cutting tiles. In order to make a cut in tile or porcelain stoneware you will need a whole algorithm. It consists of several of the following points:
- Prepare for work. To do this, wear personal protective equipment. gloves, mounting goggles, respirator.
- Then, in the selected area of the tile, make a marking, where you want to make the cut. Use a glass cutter, a sharp diamond or carbide drill bit. You can draw a line for the trimmer with a marker. But this option of marking is unreliable, because when cleaning dirt, the drawn strip is wiped out.
- Lay the tiles on a flat surface so that some of it is on the edge. Cut off the top layer of the tile by 2-3 mm, then repeat the procedure until the material is divided into the required number of pieces. You can immediately make a deep cut, but in that case it should be performed gradually 2.5-3 cm along the line. Obligatory help of an assistant or independent reliable fixation of tile raw materials.
Important! When cutting tiles, be sure to put under the bottom an old piece of plywood or any other sheet that is not sorry. It will help save the table and any other surface when making too deep cuts.
But before you start cutting tiles with an angle grinder, you should choose the right method for yourself. It can be any of the following:
- Multiple recess. up to three millimeters until the complete separation of the tiles;
- Cutting to the full thickness at once when making small sections. 2 cm each;
- With a marking on both sides, and a cut on the back. This option will prevent damage to the glazed layer on the front of the tile.
For this type of work, you should choose only new or perfectly sharpened discs. Otherwise, the fragmentation of the tiles can turn out with breaks.
Operation of the jigsaw
You can also do without a tile cutter and angle grinder. Usually, as an alternative to these two tools in the household there is elektroobzik. But, cut tiles with it with caution. In addition, the kit comes in handy another saw on the stone. To act as follows:
- Wear personal protective equipment, and then make a marking on the back side of the tile.
- Replace an ordinary saw with a set for stone, fix the material securely and start cutting from the edge.
- If it is necessary to make round tile fragments, you should move the jigsaw smoothly, because the saw tends to stick.
As a side note! This technique for porcelain tile flooring is excluded, as the jigsaw does not cope well with this thickness. Part of the process can be made easier. Wet the tile well, but also such a material will be very difficult to cut.
Manual tile cutter
This type of tool is designed strictly for making perfectly straight, straight lines that are drawn vertically or diagonally. Operate this tool to promptly cut the desired amount of material. To make a cut, do the following:
- Make a clearly visible mark on the tile fronts, then open the carriage and the drive roller on the tool.
- Place a tile with a marking on the slides and lower the cutting roller on top of it. Press the handle to start the cutting process.
- Then remove the cut pieces and install new material, if necessary.
In the case of a hand-held tile cutter, you need to keep a close eye on the cutting element. It tends to blunt quickly, especially after the cut of poor-quality glazed tiles or unsuitable material. The main thing is to replace the consumable in time, so that the cutting is performed evenly.
The tile cutter
This is a kind of cutter, on one end of which there is a metal roller, on the other end there is a transverse strong plate. This tool is considered ideal for cutting tiles at home, and is even suitable for making curved cuts.
Suitable for small amounts of work. No special instructions for use.
Electric plunge cutter
Handy tool, a special professional model. Suitable for work with both narrow types of tile and tiles of floor type (their thickness is several millimeters thicker).
It is characterized by the precision of the cut, and it does not depend at all on the thickness of the material, its composition and its strength. The cut is made according to the marking. Suitable for curved cuts and straight cuts.
Tile wet cutter
Such a design of the manual type can be at every owner. Its operating principle is liquid cooling. Water is used not only to cool the cutting mechanism, but also to prevent the formation of tiny chips, dust and shavings.
Tile feeding in a household tile macro cutter is carried out strictly manually. Only industrial models are equipped with automatic feed.
Small hole diameters can be produced with pobedite drill bits. Such approach is actual for diameter up to 12mm with tiles. A drill or a rotary tool is chosen/adjusted to the power of 800 W. The chuck must be centered in order to avoid hammering into the tile. If the surface is smooth, then 4-5 pieces of masking (paper) tape should be glued on it to prevent the drill from slipping.
Standard holes up to 50 mm in diameter are drilled using core bits with pobedite cutting edges. It is better if they are equipped with an alignment drill. It will not allow the cylinder to move off the marked lines. The cut is started from low rpm until the initial groove of 3mm is formed. Further the speed can be increased.
Non-standard size holes (55, 68, 71 mm) are made with a ballerina. This is a unit with a pilot drill bit to which the cutter is clamped by means of a rod. The distance between the elements is adjustable, the fixture is a clamping screw. The latter is considered the weakest point of the tooling, but insufficient tightening of the structure leads to violations of the correct drilling process.
It is often necessary to design inlets for sewer or ventilation ducts with a diameter of over 100 mm. An angle grinder with diamond disc is used here. Less often is the sawing with the side edges of the disk without the guard. often separate notches are made, the tiles are broken with wire cutters or pliers, and the edges are filed or roughened with a disk. A third option is an electric jigsaw.
The main points in a nutshell
For cutting tiles at home, tools with carbide cutters, rollers or interchangeable discs are used.
The glass cutter almost never cuts porcelain tiles. A manual tile cutter is used.
With interchangeable diamond discs, it is acceptable to use an angle grinder, circular saw, electric tile cutter.
Artistic cutting can be performed with a hand jigsaw with a diamond wire or with a more advanced waterjet machine.
Holes in the form of a circle are formed by drills, crowns or a ballerina. For large diameters, an angle grinder or jigsaw is used.