How to Glue a Belt for a Sander
The following prompted me to search for information and further experiments.
1. Assortment.In my work, I used to use 4 types of grain size “skins”: 40, 80, 100 and 150.For 3 years of operating my grinder, I have never met any 40 and 150 grit bands ready for it. Perhaps they exist in nature.
2. Price.One finished tape for a Jet or Bison garage grinder costs a little over 100 rubles. A square meter of sandpaper is an average of 250 rubles., Of which 10 tapes can be made. Than four-fold reduction in the cost of consumables is a serious motive for me.
An additional incentive for me was also the fact that everything had to be made from improvised means and materials, without resorting to high technology. Simply put, on the knee.
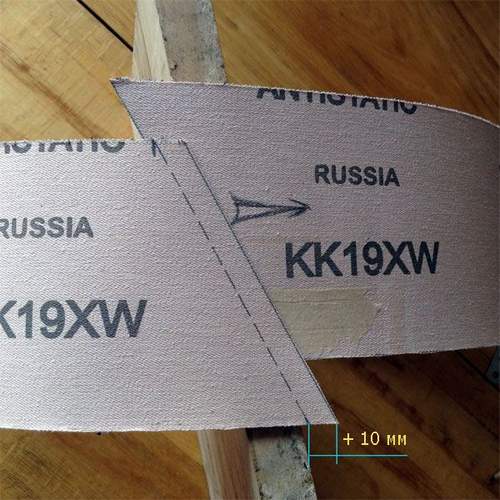
So, we tear off from the canvas a strip of the desired width and centimeters 20 longer. We mark on the inside the exact length of our tape 10 mm. For an overlap. The length of the tapes is always indicated in the instructions for the equipment. I have it 914 mm. Total 924 mm. Make a bevel. I did, looking at the standard tape. This is understandable. The angle should correspond to the diameter of the rollers.

An important point is the direction of rotation and, in fact, the overlap.
On the whole rolled sandpaper on the reverse side, there are arrows. The direction of grinding. In my case, it did not hit the lens, so I had to draw it myself. Remembering what’s on top and what’s on the bottom is simple: the first “car” in the direction of travel should be on top, the second on the bottom.
Next we will prepare two strips about 20 mm thick twice as wide as the tape. Turn the tape over to the front side and mark (with soap, chalk) 10 mm on each end. Miss one the bar and both marked ends with the usual Moment glue (it can be 88th, epoxy, polyurethane or cyanacrylate “super moment”). This is done in order to free our tape from abrasive.
The reason is simple: the smaller the step at the junction of the sanding tape, the better. Vibration, durability of the tape and grinder, clean grinding, noise and much more depends on this stage. At first I shot abrasive with a round file (putting the tape on a rolling pin). But over time, he realized that:
A) I lose 1 file per month;b) I have a file called AL-KO!
Then I wait 15 minutes for the glue to set. I cheer him up with a building hairdryer. I put a piece of wood smeared with glue on top onto the smeared abrasive, put it on the bottom clean and tighten it tightly with clamps!
After this, I wait another day (or as much as the glue needs). I tear off the adhesive joint sharply and see something like the following:
On the first try, nobody can clean the entire abrasive. This is normal. To remove the remaining spraying, you can use the same round file, a thin knife or a scalpel. It’s not bad to pre-mash marked areas or to slightly beat off on a bar.
Then again we apply glue, wait 15 minutes and already without a hairdryer we beat off the connection with a hammer. From the front part. The tip.
From the inside. The plane. For beating flat billets, I have a plate (such as an anvil) of 10 mm steel.
Of course, each master has his own experience with 88th glue. I was taught by Tatyana Mikhalenko (Orlova). A nugget, a genius dressmaker and a craftswoman who taught me how to work with genuine leather. And by the way, in the instructions for most of these adhesives, it is written that force pressure is more important than its duration.
In a maximum of 24 hours you will receive a working tape for your grinder.
This tape is glued using a similar technology. She walked in the grinder for a week, and, as can be seen in the marked area, there is almost no step.
The “trick” is not mine. Nevertheless, he placed her here for 2 reasons: her importance to all artisans and multiple personal thanks to her discoverer 🙂
It is all about quick heating and slow cooling of the heel of a hand-held flat grinding machine. On the grinder, the heel and tape are longer. The first manages to cool, and the second does not have time to heat up. As a result, the seam experiences less thermal stress. I tried in this way to glue tapes for my LSHM Caliber 750E. The result is negative. “Boars” say you need to use Neoplast glue.