Tools for working with leather with your own hands
How to properly sharpen a dangerous razor: strap or stone?
There are dozens of types of tools used for processing leather goods.
What to cut leather with
When working with leather, you have to make many cuts, and remove excess material. To easily handle these tasks, you need to use special cutting tools. These include the following:
- Knife with detachable blade. It has a small size and is well suited for cutting dense material. With removable blades, the knife will always be sharp and ready to work. Such a product is relatively expensive, so many novice craftsmen prefer to use an ordinary office knife. It can also handle the task well. Its only disadvantage is the need for frequent sharpening.
- Leather scissors. Specialists recommend using a tailor’s tool that is self-sharpening. No pencil scissors should be used. They will dull quickly and make crooked cuts.
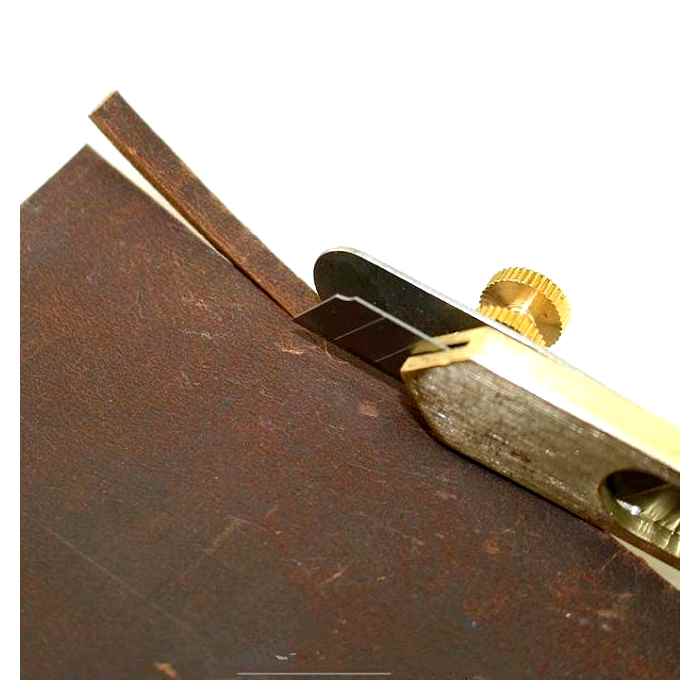
- Chamfering tool. This metal tool has a bifurcated blade on the end that easily processes the edges of the leather product. Any shaper has a wooden handle that will not slip out of your hands or rub your leather.
What surface to cut leather on
Leather should be cut on a special board. It must have a standard set of features that ensure effective and safe work.
- Roughness to prevent the material from sliding;
- high hardness of the product, capable of withstanding strong pressure with a sharp knife;
- The board must not be fibrous.
Plastic (e.g. kitchen board) meets all the above requirements. This material is able to perform its functions for a long time and not lose effectiveness. Among other options, you can choose such:
Thinner than leather
Thinning (skinning) is the cutting of the edges of the material in order to create a minimum thickness of the manufactured product. To perform this work, it is necessary to use different kinds of knives and other similar devices. The most popular among them are the following:
- German (shoemaker) knife. It has a triangular shape and a slightly rounded end. The main feature of the product is one-sided sharpening. The knife thins the material well without tearing it in other places.
- French knife. Unlike the German one, it has a semicircular shape. Its blade must always be sharp, so the master has to often sharpen the product.
- Leather slicer. It has a sharp blade that is extended relative to the head of the tool. This allows the planer to remove a thin layer of machined material after each scraping.
How to cut shoelaces
To obtain thin and long laces, craftsmen use bevelers. This device is sharpened sharply and easily cuts through even the densest material. If you can not buy it, you can do the work with a knife and ruler (metal).
Tools for embossing on leather
Embossing is the extrusion of various patterns and images. During this operation you need to use special stamps. They are metal tools that can easily be pressed into the product and leave visible marks.
For stamping on leather by hand you can use the forms, which are simple enough to make from various improvised means.
What other tools are needed
In the process of making an object you may need different tools for working with leather. Most of them can be purchased in special stores or make their own hands.
- Puncher. It is made up of a metal base, to which needles of different sizes can be attached. This tool makes it easy to get a hole in leather.
- A saddler (wood or metal vice). They are used to fix the leather piece in position.
- Clamps. These tools will be indispensable when gluing 2 pieces of leather. Clamps will hold them firmly together and eliminate the possibility of shifting.
- Marker. It is a tool that has a rotating wheel with needles on the end. As you spin the wheel, each needle lightly pierces the material, leaving a visible mark on it.
Where to buy tools for working with leather
Most tools are sold in specialty or construction stores. Some tools can be purchased in the sewing supplies departments.
Features of construction preparations
If you decide to do the house construction yourself, you will have to solve a lot of tasks, many of them are not even directly related to the construction.
First of all, it is worth determining a few important parameters:
- The size of the timber is one of the most important parameters, because it is the size of the cross-section of the timber affects the thermal conductivity of the material and the energy efficiency of the house. On the market for lumber available bar with the size of the parties 100, 150, 200 mm, and it can be either a square or rectangular. Although the principle of “more. better is better in this case, but increasing the size leads to an increase in weight of each unit of timber, which is critical when performing all the work independently.
- Planning of the house. even the construction of outbuildings requires careful planning, not to mention a residential house. In the case of houses made of timber almost nothing changes. before the construction you will not only have to create a plan of the house, but also, if necessary, to prepare all the necessary documents to put the structure into operation.
- The size of the house. when planning, be sure to calculate all the dimensions of the structure, because they determine the amount of materials to build the house. Take into account absolutely all the nuances. from the total length of the walls, to the number of interior partitions, and other parameters that may be missed during construction, but will be discovered after its completion.
- Features of the soil. during the construction of such any kind of structures on the site, you should pay attention not only to the technical component, but also to the peculiarities of the soil. If the soil is quite loose and unstable, even a massive foundation can sag, which will lead to cracks, as well as the occurrence of loads on the walls themselves from the beam. Of course, wood is more resistant to such defects, nevertheless the destruction of the foundation is critical for any house.
- Features of the roof. the type of roofing design is also related to the layout of the house, as well as features of the choice of building materials. If the construction is too complex, you will need to take care of various auxiliary structures that simplify the installation of the roof.
Of course, these are all basic requirements and parameters, since each design is individual, and differs from the others. Having acquainted with this information, you can proceed to a breakdown of each stage of the construction of a house from a bar.
Making from a fork
The puncher can be step and string. The last option can be made with your own hands from an ordinary fork. Before proceeding to the main process, you need to prepare materials and devices.
- Fork. The main requirement for a cutlery is durability. A fork made of stainless steel is ideal, but it is better to refuse the aluminum device, since this material is too soft.
- Metal saw.
- Punching tool.
- Hammer.
- Pliers.
- Gas burner.
Before starting work, it is recommended to make the fork tines even. To do this, it is necessary to clamp it by the handle in the pliers, and the teeth themselves well heated with a gas burner for a few minutes. After that, it is necessary to put the fork on a hard and even surface, and tap on the prongs with a hammer. After such manipulations, they will become flat. Then it is necessary to use a metal saw.
It is required to shorten the cogs, but this must be done so that their length is equal. You can even make a drawing. marks on each tooth, where you need to saw off. For convenience, you can shorten the handle, because initially it has a large size, and it will not be very convenient to use such a hole puncher. The next step is to sharpen the teeth on the emery board.
At this stage, too, it is important to check that the length of each prong remains the same.
Making from screws and tubing
A step leather puncher can be made from a metal tube. The manufacturing process is not complicated. The following materials and tools will be needed.
- Metal tube. Its diameter must be determined independently. It depends on what size holes will be needed.
- Two metal screws.
- Sanding block.
- The drill.
To begin with, you need to take the tube in your hands. It needs to be well sharpened on one end with an emery machine. Then you can move on to sharpening the other end. There you need to drill two holes with a drill, screw in screws. they will serve as a handle in this case. The bolts must be firmly fastened. The step perforator is ready.
What is the neck?
Sharpening is an important and delicate process that can be used to give the leather the thickness you want. You want to even out the density of the material where you join the pieces, but if you don’t have the right thickness, you will have to sheathe the whole surface.
Important! It is desirable to learn it on small scraps of skin left after cutting the product, because if an error is not sorry to throw them away after use.
For this kind of work you will need a special tool for working with leather with your hands. a Plexiglas stand, which should be placed on the table like a school notebook. at an angle to the edge of the table of about 70 degrees:
- The skin is placed on the tile with the fret upwards, and is located close to the front and right edges, press it firmly with the fingers of the left hand.
- Use your little finger, ring finger and middle finger to grip the knife from below, place your thumb against the edge, and press the tool in the center with your index finger from above.
- Keep the blade of the knife, the index finger and the forearm in alignment during the chewing motion.
- The work must begin at the edges, gradually moving away from you.
- Hold the knife slightly to the right.
- Cut thin layers of leather: to do this, lead the knife parallel to the surface of the plate.
Important! Do not put the fingers of your left hand in front of the knife. you could easily cut yourself.
Important! This may be difficult for beginners, but with experience and a good tool for working with leather with your hands, the procedure will not require much physical effort.
- You can varnish, shoe polish, mastic or beeswax on your finished work. To apply them, use a special sponge or a soft cloth, and then polish the surface with a flannel flap, which will protect the future product from contamination.
Important! To fix the color of the dyed product, it is recommended to cover it with a layer of leather varnish or egg yolk.
What to cut the material?
Sharp scissors and a knife will help you to cut leather materials successfully. For this purpose, you can use a shoemaker, wallpaper knife, or office knife, and a medical scalpel will also work. You should have at least three pairs of scissors:
- To cut straight lines or cut thick leather. tailor’s large.
- For the rounding. a medium-sized scissors.
- For cutting small parts. small manicure.
Important! It’s best to start cutting with straight lines, because you can cut with a knife while the leather will be fixed, and then, after detaching it, you can cut along the curves.
Today there are special tool kits available for sewing leather by hand, which can be purchased as a complete set.
Everything for working with leather: from punches and stamps to paints and accessories
than 450 items with delivery in Russia
We do tanning ourselves and know how hard it is sometimes to find the right material and the right tool for the job. Sometimes there’s a little thing missing, but it completely stops the process of making a product. That’s why we’ve set up a special store for like-minded people, where you can buy everything you need to work with leather: tools, chemicals, fittings, thread, and the leather itself, including vegetable tanned leather. Come to us and you will find any product in one place.
Delivery all over Russia
Do not want to wait, pick up your order yourself in our store.
Leather step puncher
If you plan to hand stitch parts of a thick leather product, you need to pre-punch holes in the leather. The best way to do this is with a step punch. Its shape is similar to a fork, where the teeth have a special diamond shape. Just determine in advance the size of these teeth, and if necessary. place them at an angle of 45 degrees to the hole. With skill, you can not only use a hole punch to mark the line for the trimmer for a straight seam, but even to make a sweep of the leather product.
To prepare a leather piece for a Mexican braid or braid, you can make a step punch with the teeth arranged diagonally. They can also punch a hole in the suede and leather, which thickness is not more than 5 millimeters.
A set of tools for working with leather.
Hi! I have to admit right away I am an amateur in leatherwork, but lately I have become fascinated by it. After watching the clips on YouTube, my enthusiasm has increased. Naturally the first steps can be done with minimal tools from the nearest grocery store. But I managed to get a whole set of special tools for the review. The tools, of course, are Chinese. There are a few different kits on bangladesh. Because of the number of items at a glance, eyes are confused and it is not clear which one is better to choose. Or take specific items individually. I took a set of, as stated, 30 items and decided on my own experience to understand which of them are really necessary and which can be done without. Packed all this goodness in a plain cardboard box, and packed in bags The contents fit nicely on a piece of chipboard 60×40 cm I will begin, perhaps, from the description of all items set. I’m not sure if I’ll call it by its proper name, but I’ll try. I will open the list with knives, as it is one of the basic tools in the craft. 1. And so for cutting leather you can use this circular knife. Very sharp. Diameter of the blade is 45 mm, maximum cutting depth is up to 8 mm. Great for straight cuts. It is also possible to cut along a curve, but with a large radius limit. Not the least of these is the thickness of the skin. The deeper the blade penetrates into the material, the harder it is to make shaping movements. The advantage of this knife is especially felt when cutting thin leather 0.8. 1.6 mm, as the material does not pull behind the blade. Which allows you to make the cut more accurately, and the edge is obtained smoothly without any nicks and microcracks. Changeable blades in the kit does not have, but dokupit their not a problem, and in domestic internet stores, the truth are not happy. 2. Next on the list is the saddler knife. Initially it is rather sharp (one side sharpening), on one side of the blade there are characters. Blade width 35 mm. For cutting leather, local thinning and rounding corners. Convenient for straight cuts under the ruler. It is possible to make curved cuts too, but not small radiuses. Anyway for me it’s more convenient to use the knife with classic cutting part layout. When working with the reviewed knife, its handle is practically at right angles to the workpiece. 3. There is also a model knife with collet clip. In addition to the blade that is already in it, there are five interchangeable blades in the kit Great for shape cutting. But, as for me, it’s already inconvenient to work with a material thickness of more than two millimeters. 4. Needle set. Seven in a set. Directly for leather, according to the information I found, correspond to two of them. Distinguished by their triangular wedge-shaped tip. They’re not too sharp, to prevent damaging the thread during saddle stitching, for example. Also, there are two ordinary straight needles with a large eye, two curved needles and a sack needle, with a characteristic flattened and bent point I do not think that all of them are so necessary. Personally, at this stage, enough and the first two. 5. Ditch cutter with adjustable stop. Serves for plotting grooves for the future seam. Mostly applied on thick leather. At first it seemed to me completely unworkable, no matter how I tried it only scratched the material and made scuffs. Looking closely I saw a burr on the cutting part after the factory sharpening (or where it is sharpened there) a little manipulation with sandpaper and order true good cuts only a tough skin, with soft material is not always good. 6. Edge cutter. Needed to chamfer the edge of the leather to give a more aesthetic look to the product. Like the previous tool. works well on tough leather. Particularly useful for beveling the back side of the leather. 7. Parallel seam line marking tool. Maximum width 20 mm. It’s pretty useful. Unlike the groove cutter does not have a sharp cutting part. And if you don’t work hard at marking it, you can smooth out the trimmer line after it. 8. 9. 10. Roller marker (copier). Used for marking for future seam holes. There are three of them in a set with different spacing. Two of them are blunt. just leave marks on the skin, and one is sharp enough to make holes in the thin material at once. The upper tool I recklessly mutilated before photographed its original form. I can only say that it differed from the second one only in pitch. My barbaric acts were aimed at achieving a certain goal. The thing is that the first two tools had practically the same pitch. 2.4 mm and 2.2mm respectively, the third one has a pitch of 3.3mm. These values I got by dividing the length of the segment by the number of marks on it after marking with each tool. So the presence of two tools with almost the same pitch, it seemed to me not logical, and the lack of marker with a pitch of 4 or 5 mm. a drawback. It was decided to correct this mistake by removing the extra teeth of one of them. Armed with pliers. broke off the excess. I apologize for the hurt feelings, I later fixed it with an emery). And it would have worked, but in the process I got a little confused and broke off the teeth at the wrong marker. The odd number resulted in this nonsense. The other two in close-up. And this is what the marking 11 looks like.The awl. Actually the tool known to all. The only difference from the known, it has a cone shape. Thanks to which you can make holes of different sizes. That’s all I have to say about it. 12. Another very useful and handy tool for making holes. According to the bar code, made in Japan. The device has six interchangeable nozzles with a diameter of 1.5mm, 2mm, 2.5mm, 3mm, 3.5 mm and 4 mm. Used for making holes in belts and buckles. The advantage compared to the turret cutter is that there is no limit to the step from the edge of the workpiece. I use it for stitching holes. Much better than an awl. To make the hole, you need to press the handle and through a screw groove in the working part, the forward movement of the handle is converted into a rotational movement of the cutter. Of course it is hard to get a straight stitch, but this is how I get out of the situation. I will come back to this later. 13. Another tool for edging is the bevel cutter (corner cutter), which allows you to cut the corner of the skin with a uniform depth, rounding it. The bevel cutter is designed for thicker, harder leather, with a 5 mm width of cut. Unfortunately the tool in my kit is disgustingly sharpened. I tried to correct this case, but I was not successful. 14. A router for processing the fringe side of leather. Designed to shear (thin) the leather to the desired thickness before stitching. Complete with a set of ten interchangeable blades. Probably because of the quality of the latter I could not fully appreciate the convenience of this tool. 15. 16. 17. Three more groove cutters. This time non-adjustable, that is without a stop. Sharp, works great on both soft and hard leather. No problem to cope with the bahtarmen side. Although they have a different shape of the cutting part, the actual grooves are almost indistinguishable 18. I do not know the name of this tool. And I can only hypothesize about its purpose. Could conceivably be used for embossing. It is poorly sharpened. 19 Wax. It is used in finishing the product. Decorative and practical function. closing the pores of the leather for moisture protection. There is a 40x40x15 mm piece in the set. Pretty solid. It’s better to grind with it by preheating with a lighter. 20. 21. 22. Slickers for polishing the edge of the leather. There are three in a set with different configurations. Round one provides for installation on a dremel or an electric screwdriver. 23. 24. String waxed. There are two coils in the kit, black and beige. Flat cross-section, braided, width about 1 mm. 25. 26. 27. 28. 29. And the last element. strips of sandpaper for buffing the edge of the skin. All five are the same performance. have (at a glance) about 80 grit on one side and about 120 on the other. Which of the elements the Chinese consider to be the thirtieth. one can only guess. But, it’s not the quantity that makes you happy. There is one very important element missing in this set for full performance. the step punch. It is with this tool that you can get straight seams and an exact match with the holes in all the elements of the product. I would have sacrificed a good half of the set for it. In the near future I will add these punches to my tool kit. In the meantime, as I already wrote above, I’m using a hole punch. But I can’t achieve an even seam with this method. And it takes quite a long time. Another device, which you probably can’t do without in this craft, is a saddlestitcher’s pony. Actually, this is a clamp for fixing all the elements of the product when sewing. I made it in about 10 minutes from scrap wood. And so. After shredding a few unnecessary pieces of old leather, I decided to finish this pointless exercise and do something more interesting. For this I bought a piece of leather crazy Horse 25×20 cm and a thickness of 1.6 mm. This piece cost me 2.5 plus shipping. I ordered a size without a specific purpose. For a regular purse 12×9 cm will be enough, for example, a piece of leather 30×25 cm. it will cost about 4 if you order it by the cut. You can save money by buying a whole skin. My first product was a primitive purse. Decomposed, took on the work On the cut out parts clearly visible uneven row of holes under the stitching Fixing details began to sew the other side of the whole process, from cutting to the last stitching took me no more than an hour and a half. This is what came out of it Of course primitive, but I hope it will not always be like this). I return to the question of the usefulness of all these tools. Naturally, you should not take the opinion of a layman as a guide. But I will state my subjective opinion. I will go by method of elimination of the most useless elements. Facer cutter I think a long time will lie idle. Strips of sandpaper also seem to keep him company. Planer. Perhaps rehabilitate and I will be able to appreciate its usefulness after the purchase of good blades. But so far nothing. Two stitch markers with almost the same pitch, I think one would be enough. And there’s not enough with a bigger pitch. There are a lot of groove cutters, too. For the rest of the tools and materials (thread and wax). no questions yet. I’m going to end here, I already have a couple of ideas for presents for my nearest and dearest, so I need to keep practicing. Thank you all for your attention. П.С.
Leatherman’s set 37 items, “Not just Leather” part 1
Repeatedly bought a purse from inexpensive materials, but for a short time they all fell into disrepair I wanted to make for myself a good and proper size / style purse made of leather, but to work with it you need a special tool. I ordered this set from the store for review. As a starter will go quite well, but to buy some tools later you will have to. And I can say with certainty that I have a new hobby. leather goods, where a lot of nuances, important little things and moments, worth to understand and master, for a long winter evenings is great. Delivery. standard, one month. Packaging is a bag, inside a box, quite full and weighty. Everything in the kit. tool wooden handles made of beech. Distributed by function: Marking of the material. Line markers/copiers, 3 mm, 2 mm, 1.5.mm. Alternative sabre-cutters / sabre-tapping saws, angular, shaped. U, U, V, P (6mm). Good sharpening. Examples of cuts on a 3mm thick calfskin leather corner U-shaped u-shaped V-shaped U-shaped, 6mm Splint, Parallel marker/creaser, Groove cutter circular/groover: The awl is simply sharp and polished, it penetrates well into the material, the Kriser is adjustable between 0. 15mm, the plates on the working edge are tapered but not sharp, example of marking with it: The groove has an adjustable cutter, with a radius of 5. 30mm, designed to cut a semicircular groove in the leather for subsequent sewing the leather through this groove, example of a cut: Polishing leather trim/edge. Round slicker disc for dremel, cylindrical slicker, flat slicker, polishing wax 25gr.. “Slicker”. a tool for smoothing leather cuts. Grooves on the slicker are designed for different leather thicknesses. Sewing part. Brown and black waxed string, 50 meters each. Needle set. Stitches with black thread. Material cutting, embossing Planer spare blades, scalpel spare blades, embossing tool, straight saddler knife, circular 45mm knife. Sharpening and metal of the cutting tool is excellent, you can cut noodles from leather Disk knife, cattle leather 3mm cut at a time. Slicker rotary multi-caliber punch (1.5/2/2.5/3/3.5 mm) Test on 4 mm thick strap, 3 mm hole.5 mm, etc. Doing it with one blow with the palm of the hand. Planer. Thins edges in thin strips. Abrasive plates, double sided. in various grains. For the first tests I bought two pieces of leather “Krazy Horse” (sheepskin 0).I got almost the entire piece of leather for my experiments and mistakes.My shop in Krasnoyarsk has a great selection of leather goods and knowledgeable staff. I decided to make a phone cover out of sheepskin leather (6 years old).44″), since the old one is already quite worn out, but for the template will do. We make a marking on the wrong side. I will say right away that for experiments and errors took almost the entire piece of leather. The circular knife is very sharp and you have to make only one side of the ruler at a time, if you go back and forth there is a chance to spoil the neighboring piece, which I did. Glue the “sandwich” of leather-plastic-leather. Glue for leather “Krazy Horse” use only water-based, at the worst PVA, other glues will soak the leather and destroy the special coating on the front side. Stitch around the perimeter of the workpiece (the first time, by hand, please do not judge severely), glue “bumper sticker”. With a scalpel we cut the holes (you need to buy shaped punches) Done. As a result, I can say that the kit was very useful, the case is of medium quality (leather 0).5mm is a little thin, you need 1mm, the plastic insert is inserted full width or very close to the edge). There is still a lot to learn. I am waiting for a pattern for making a purse, this kind: There is still a pattern for a briefcase, but it will take me to it when everything will be fine. Thank you for your attention, there are a few more reviews to come on other leather tools.
Item provided for writing the review store. This review is published in accordance with the article.18 Site Rules.
Preliminary preparation
First you need to decide on the future model of the product. For this, you need to find a suitable pattern on the Internet. You can borrow an idea from the leading fashion brands and make a pattern of your own taste, but it is quite a time consuming process. At the preparatory stage let’s define the color. If you are a follower of the classic style it is better to choose pastel or classic shades. If you’re a fashionista, you can take a brightly colored leather.
The next step is the selection and purchase of material. The variety of natural leather is a great many, so you need to pick the material that suits you by its qualities. The method of dressing depends on the density of the leather, its ability to stretch and durability. All these nuances must be taken into account.
By the way! You can sew a product from an old leather jacket. You will save money and give a second life to unwanted clothing!
It is very important to buy enough material. To do this, go to the store with a ready made pattern and lay it out on a piece of leather. So you avoid overspending or worrying about not having enough backing. Be aware that you will need leather for hemstitching, sides, collar insides. Consider in advance whether you’ll need additional material for s or other decorative elements of the product.
advertising block 5
May 19th, 2019 admin
Good afternoon, today I fell in love with a new ornamental. I fell in love purely theoretically. Myself never yet mastered with leather. But I held in my hands these amazingly beautiful, deliciously fragrant leather goods. And I saw the beauty. the wild and free beauty of real living material. Natural leather. is a clot of energy collected in itself the vitality of the animal, the creative power of the master and the soul of the image, which came to life in the new skin. After digging through the abyss of the Internet, I found some wonderful ideas for leather crafts that can enrich the minds of creators working with leather. After all, so often it happens that the eye is washed away, the hand gets used to the same forms, and ideas revolve around similar images like brothers. Therefore I have decided to write an article (and not one) on the most interesting and ACTUAL ideas for today which you. masters. can embody from leather. And sell. Monetize their work, their labor. And the main thing in this “sale” is not so much money as the knowledge that the thing has found its partner. The person who coincided in spirit and idea with your leather child.
So let’s go through the collection of ideas And suddenly we’ll find something here that will spark the eye, and will capture the impatient trembling hands of the creator.
Leather crafts.
Nice leather boar keychain. Ears are tucked into the slot and sewn together.
You yourself choose the design of the animal’s muzzle.
Doggy keychains can be made for any breed of dog. Such a product made of leather, made by your own hands will be a great gift for the owner of a pet dog.
You can decorate our leather craft with iron buttons, rivets, clasps, rings.
The elements of the breloque may contain rivets and buttons. and it may be even functional, not only decorative.
Here below in the photo we see an example of the functionality of leather crafts. Keychain Coinette. Or a keychain-keychain.
A leather coin-ring keychain looks like this. In the round seam we leave a small hole (at the bottom or top) and through this hole will throw the strap with one or two buttons, which is an important part of the muzzle. It turns out that the design of animal’s muzzle itself determines where to make a slot for a coin slot.
Also under this design can be made and leather keyring-keychain. where the keys will ride out on the inside of the leather straps. Simple actions. undo the button, shake. the key will fall out by itself and hangs on its strap.
The same principle of shaking out the keys is used in this keychain. a cute little craft made of leather in the form of a dog. Where the keys are attached to the strap (it is on the photo above the doggie’s head). To hide the keys back into the keyhole, we pull the strap up, bend it down behind the doggie stitch and fix it there on the button.
Cigars, bookmarks, souvenirs.
In this day and age when they draw horrible pictures of corpses and decomposing tissue on cigarette packagesyou just have to have a normal PORTSIGAR.
Make with your own hands such a leather cigarette case with separate cassettes for each cigarette. not so difficult. This is where the wooden blanks, the pads, help. That is Between the stitches of the two layers of leather laid wooden round sticks (the size of cigarettes). The leather is stitched close to the wand. A new stick is inserted and a new stitch is made. So with the sticks and leave. You can soak and let dry, then the form will be preserved. And then the case for the insertion of a leather cassette with the sticks is OTHER WELL ON THE BOOK DONE. From wood we make a block of the necessary volume of convexity (as under the cassette) and under this block stretch the skin, let it dry. Stitch. The principle of working with pads of wood a little lower in the same article is shown (on the example with the convex purse through the belt). Read on and everything will become clear
Very dignified and stylish look natural leather bookmarks for books. It’s nice to read when the smell of typographical paper meets the smell of real leather.