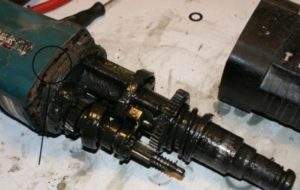
How to Assemble a Makita Rotary Hammer

Everyone who has a tool bought 3-5 years ago should understand the steps involved in disassembling a Makita punch. Frequently used equipment breaks down. It is difficult for a home master to do without it. With the help of a puncher, you can start minor repairs and even construction, for example, to equip an extension to the main part of the house.
If the owner of a Makita punch knows how to disassemble and assemble the tool, he will be able to replace the worn parts, lubricate them with grease and avoid further equipment malfunctions.
The uniqueness of the Makita interior design
The design provides a protective mechanism that limits the spread of dust during repair work. In order for the tool to continue to work without loss of quality, there is no need to constantly clean the Start button and other levers, parts from debris.
But the main thing that allows Makita to each owner is to feel like a real man, the owner of his home. The financial costs of servicing the device are also pleasantly surprising. The cost of a new product is small.
The unique SDS system, declared by the manufacturer, allows you to fasten the drill with the Makita apparatus. In addition, 3 functional formats are built into the system, you can also hollow walls or drill holes. The largest amount of work is 4,500 beats per minute. Power from the network is 700 watts.
Why hollowing is better to limit
Despite the fact that the instructions for the use of a Makita puncher indicate the characteristics of hollowing the surface, you should not buy a tool for the constant execution of this work. Technique may fail. The drill will fly out of equipment. Trying to bring the device to life by persistently turning on the drilling mode when it breaks is a big mistake. It is better to understand the cause of the malfunction.
The list of reasons for the breakdown of the Makita rotary hammer looks like this:
- The intermediate shaft is worn;
- Deformation of clamping format nodes occurred;
- The connecting rod system is out of order;
- There is not enough lubrication for the correct functionality;
- Shock parts are broken.
Use a tester to identify a defect. Connect it to the tool plug and press the switch. If resistance occurs, the power circuit is functioning correctly. Decide on the remaining possible breakdowns, armed with screwdrivers, wrenches, a hammer, a wooden extension.
How to repair Makita do it yourself
If you have never encountered disassembling a Makita punch at all, it will be difficult to do it yourself by watching the instructions of the masters. The first step in disassembling is to remove the chassis base. Then, while repairing the equipment, obsolete grease should be removed and dirt and debris removed from the parts. If the functional units are faulty, replace the old with new ones. Then install the components back into the structure.
To repair a cartridge 2010, a mode switch or to correct defects in the housing, perform the following set of manipulations:
- Remove the cartridge.
- Remove the switch.
- Repair any defective signs seen on the inside of the case.
- Gently and evenly spread the lubricant over the surface.
- Replace defective parts.
How to disassemble a gearbox in a Makita puncher
Disassemble the Makita tool gearbox following the step-by-step guide:
- Fix the equipment on a hard surface by lifting the barrel up.
- Gradually, without jerking, remove the casing by pressing the equipment to the countertop. This approach will help to avoid accidental movement of parts.
The process of disassembling the Makita punch is clearly shown in the.
How to assemble a tool
When the repair work is completed, and you are sure that you managed to cope with the malfunction, it’s time to assemble the parts into a whole, working mechanism.
- Before assembling, apply fresh grease to equipment components.
- Dampen a cotton swab with a little kerosene and wipe the case. You can use gasoline.
- Next, the body is put in its original place. https://www.Youtube.com/watch?V=y8V0aag3Gb8
Makita rotary hammer diagram
Unassembled equipment is assembled according to the scheme presented in the instructions for use of the device. The scheme helps not to get confused in complementary nodes and spare parts. Elements that are considered basic are included in this list:
- Locking device of ring type. Holds the ball component securing the drill. The integrated washer and spring mechanism ensure the correct direction of the drill.
- Stopper ring. Allows you to remove the cartridge cover without damage to the parts.
- Screws connecting the gearbox to the motor, excluding vibration. There are rubber parts in the circuit. If they fail, the pads are replaced with new ones.