How to cut the corners of baseboards without a pitchfork
How to cut a ceiling plinth in the corners without a joiner
Every beginner, who started the repair, sooner or later wonders how to cut the ceiling skirting boards in the corners without a ruler. The scheme proposed in the article is perfect for both the beginner and the experienced master, so that beautiful flat skirting boards will please the eye.
How to cut a skirting board for the ceiling
To quickly cut a ceiling plinth without a plunge cutter, it is necessary to take into account the material it is made of. It will also allow you to choose the right tool for the job.
In the construction market most often found skirting boards made of these materials:
[alert]Tutel (baseboard, baguette or cornice) made of wood is heavy. A fine-toothed metal saw is needed to cut the corner without problems.[/alert]
Polyvinyl chloride is in a small price bracket. But any fracture or dent will not pass for it without a trace. Also plinths made of this material get dirty quickly. It can be cut with a hacksaw or a utility knife.
Option of foam plastic is cheap, but is fragile. To cut such a ceiling plinth in the corners, you should take a sharp knife or a metal hacksaw. And it’s best not to put pressure on the material.
Extruded version is much denser than a skirting board made of foam, but it is more difficult to cut it, especially without a chisel. Tools for work will need similar.
Polyurethane skirting board is considered the most expensive. It is durable, resistant to moisture and has excellent flexibility. A construction knife can be used to cut the skirting boards.
To understand how to trim a ceiling plinth in the corners without a plier, first you need to clarify how exactly it is done with it.
Varieties of ceiling plinths
Classification of baguettes is carried out by the material of manufacture:
- Gypsum. The oldest ceiling skirting boards. Special moldings were used for their molding. Various mortars were used as an adhesive assembly compound. The name “fillet” also applies to gypsum baguettes. In modern construction, they are used very rarely because of the high cost and inconvenience of installation. In addition, there are more reliable and inexpensive imitations of gypsum skirting boards.
- Polystyrene (polyurethane). The most common type of ceiling plinth. For products of this type are characterized by low cost, excellent aesthetic characteristics, ease of installation and the richness of the range in terms of design. The width of polystyrene mouldings varies from 5-250 mm. They can be used in any type of room, complementing various interior styles.
- Wooden. Expensive and rather bulky moldings, which are mainly used to decorate wooden houses with the appropriate interior. To install wooden planks, in addition to glue, often use screws and nails.
- Plastic. An excellent option for bathrooms and other premises with high humidity. Installation is carried out on a special moisture-resistant adhesive or countersunk screws.
When installing the above products, you need to know how to cut the ceiling plinth. This does not apply to plastic products, which are equipped with special corner adapters.
What tools are needed
Carrying out the installation of the ceiling plinth, it must be trimmed to size or in the corners.
To cut the corner of the ceiling plinth, as a rule, the following tools will help:
- A wood saw. It is used to work with wooden products.
- Metal saw. This tool is convenient for cutting plastic, foam plastic and plastic friezes. As a result, it is possible to obtain a fairly clean joint without burrs. When working with saws, it is convenient to use a plier.
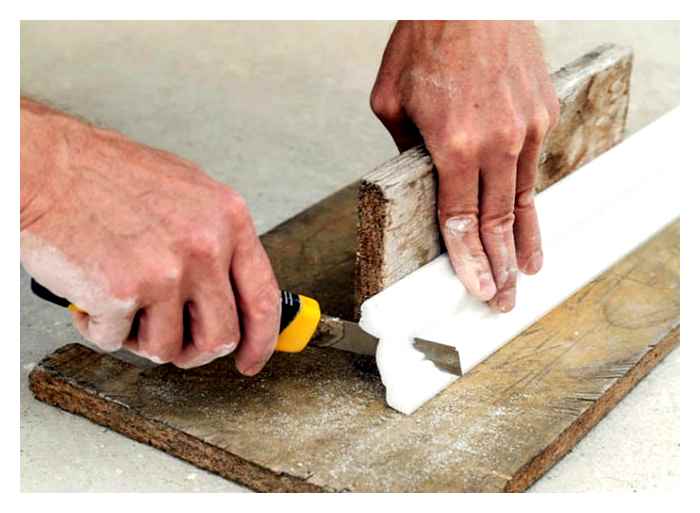
- Stationery knife. It can be used to cut foam baguettes without the need for special tools. The main thing is that the knife was well sharpened and had a thin and smooth blade. If you act carefully, you get a smooth cut without any dents.
It is important not to apply too much force when using the saw, otherwise the skirting board will crumple. It is best to practice on some unwanted piece first. It will allow you to get beautiful fragments later on.
Tacks made of foam plastic are one of the cheapest options. However, the advantage in the form of low cost is compensated by a lot of disadvantages. In particular, polyurethane foam itself is a rather fragile and soft material, which is very easy to break. Even if you just squeeze such a product in your hand, it can deform.
Because of the low strength of the foam baseboards is very difficult to handle. If there is little experience in cutting such parts, then most of them in the process will fall into disrepair, so all the benefit of the cheapness of the skirting boards will be leveled. To cut foam skirting boards usually use a hacksaw or a well-sharpened knife.
Styrofoam
By and large, polystyrene foam. a kind of plastic foam, which has an increased margin of safety. The cost of products from extruded polystyrene foam is somewhat higher compared to the foam, but the reliability of such skirting boards is much higher. To break such a detail is already problematic.
To cut the polystyrene skirting boards requires any sharp tool, such as a construction knife or hacksaw. Due to the high strength, it is much easier to work with such products. they almost do not break or deform in the process. There will be less waste in the end.
Cutting the baseboard in the corners without special devices
The question of how to properly cut a 45 degree angle on the baseboard, you can solve without a special device. To do this, carry out the following steps:
- Take a sheet of paper and put the skirting board against it.
- Draw two parallel lines marking the sides.
- Then take an ordinary protractor and measure 45 0.
- According to the mark made, draw a fishing line for the trimmer of the future cut.
- Before trimming the ceiling plinth, lay it on a sheet of paper, making sure the lines and sides are the same.
- The marking is transferred from the sheet of paper to the skirting board, and a cut is made in the right place.
The disadvantage of this method is the need to keep the saw in the air while cutting.
How to cut a skirting board for an angle other than 90 degrees
Many rooms can “boast” corners which do not correspond to 90 degrees. Such situations occur as a result of shrinkage of the soil and the building itself, as well as a violation of the technology of erecting walls.
In this case, the correct marking with a stool or drawing to make it is not possible, all actions are performed directly on the spot:
- Before trimming the corner of the ceiling plinth, it is attached to one of the walls and make a stop end to the other wall.
- Along the skirting board spend a line for a trimmer.
- Similar actions are performed on the other wall.
- At the intersection of the two lines make a mark on one of the skirting boards, which connect to the corner of the workpiece. A notch is made along this line.
- Repeat steps on the other skirting board and try on both blanks. Make the necessary corrections.
- The skirting boards are glued in place, the joint in this case should be quite tight.
Features of trimming ceiling plinth
To all efforts and finances are not lost, it is necessary to properly arrange the corners. Ceiling plinth or fillet can be beautifully laid yourself. Of course, in stores they sell ready-made corners for these cases, but it’s still an additional expense. And with a little effort, you can do it all yourself.
Next, let’s talk about how to cut the corners of the ceiling plinth at home and still maintain the beauty and neatness of the appearance. There are two ways to perform this task. with and without the help of a chisel.
Correctly trimmed baguettes on the ceiling
The use of the mortiser in the home
The mortiser is a simple tool that is a carpenter’s helper. With it, it is easy to cut blanks at any angle that is needed. Its design is uncomplicated. the tray is made of wood, metal or plastic. This tray has special slots (placed vertically) for trimming at an angle of 90 or 45 degrees.
Some models have a more complex structure with the possibility of trimming at an angle of 60 degrees. For professional work, there are special models, where the workpiece is fixed at any given angle.
The chair is a simple but important tool
- Take the baguette and apply it to the ceiling. It is worth setting aside the required length. This workpiece and is inserted into this tool in the position in which it will be placed on the ceiling. Press against the far wall of the chair.
- It is necessary to hold a notch with the left hand. The hacksaw, and more precisely its blade, must be positioned so as to create an angle of 45 degrees. The handle should be as close to your hand as possible.
Tip: For better orientation during the design of the inner corner, you should start cutting from the front side of the fillet. Where cuts have been made, in most cases a file is needed to fit both parts of the angle.
How to choose a skirting board correctly
When buying a ceiling plinth it is important to proceed not only from aesthetic, but also from practical considerations. The most common on today’s market is polyurethane fillet.
The material guarantees high resistance to moisture, strength and elasticity of the product. These skirting boards are suitable for bedrooms and rooms. But in rooms where there are frequent temperature jumps (kitchen, bathroom), it is better not to use it. Variations from heat to cold lead to significant deformations of the fillet, spoiling the entire interior.
Choosing a skirting board made of polystyrene or polystyrene foam, it is important to remember that the product is very brittle and can be damaged by mechanical impacts. PVC variants are highly electrostatic, that is why even minor dents during installation cannot be repaired and removed.
Each type of skirting board is suitable for individual use and installation. Therefore, when buying it is important to be guided by several factors:
Options for cutting the skirting with their own hands
For easy and comfortable work with the bar, craftsmen use a construction tool. a plier. It significantly saves work time and ensures the accuracy of execution.
If there is no special device in the arsenal, you can use one of the home methods:
To construct a semblance of a crosscut, you will need: a sheet of paper or plywood, a ruler and a pencil.
- Two parallel lines are drawn on the base. When connecting them with a perpendicular, you get a 90-degree angle.
- Applying along the line of the baseboard, it is easy to make an incision for a right angle. Achieve a corner of 45 degrees will help protractor or a clerical triangle.
It is important to remember that not every home has perfectly flat corners, so you have to adjust such places by hand.
To correctly cross out the ceiling, the master will need to perform a few simple actions:
- To begin with, you need to tightly attach the baseboard to the desired angle and draw a line for the trimmer on the ceiling with a pencil.
- Treat the other side of the corner in the same way. The two plinth rails must fit tightly together, leaving no gap.
- The point where the two straight lines meet is transferred to the skirting board and a straight trimmer line is drawn to the opposite side of the board. This is the place of the future cut.
- Do the same procedure with the second baseboard. It is necessary that the lines were perfectly straight. It will help to avoid gaps in the gluing process.
- It remains to cut off the excess sections of the skirting board with a construction knife and apply the laths in the corner. If both parts fit together well, you can start gluing. If the skirting is not straight, adjust the cut edges a little with a knife or hacksaw.
The process is fairly easy and straightforward, even without instructional videos. The only rule to follow is to measure carefully and use a ruler for accurate marking.
Ready-made fittings. an option for those whose home has perfectly flat corners. Otherwise, the workpieces can not give the desired effect and spoil all the aesthetics. Therefore, before you spend on an unsuitable product, you should measure all the corners of the rooms in advance.
There are also more ingenious options for cutting corners ceiling plinths with wooden bars, cardboard or planks.
Even without the presence of special devices and professional tools, you can cut even corners on the baseboard. Arrange help from improvised means is not very difficult and costly.
With proper patience and proper fitting of products, cut the corner of the ceiling plinth with your own hands, like a professional, even a beginner will be able to.
How to choose a skirting board correctly
When buying a ceiling plinth, it is important to proceed not only from aesthetic, but also from practical considerations. The most common on today’s market is polyurethane fillet.
The material guarantees high resistance to moisture, durability and elasticity of the product. Such skirting board is suitable for bedrooms and rooms. But in rooms where there are frequent temperature fluctuations (kitchen, bathroom), it is better not to use. Fluctuations from heat to cold lead to significant deformations of the baseboard, spoiling the entire interior.
When choosing a skirting board made of polystyrene or polystyrene foam, it is important to remember that the product is very brittle and can be damaged by mechanical influences. Polyvinylchloride options have high electrostaticity, so even minor dents during installation will be impossible to fix and remove.
Each type of baseboard is suitable for individual operating conditions and method of installation. Therefore, when buying it is important to be guided by several factors:
Options for cutting the baseboard with their own hands
For easy and comfortable work with the baseboard, masters use a construction tool. a plier. It saves a lot of work time and guarantees the accuracy of execution.
If there is no special device in the arsenal, you can use one of the home methods:
To construct a semblance of a plinth, you will need: a sheet of paper or plywood, a ruler and a pencil.
- Two parallel lines are drawn on the base. When joining them perpendicularly, you get an angle of 90 degrees.
- Applying the skirting along the line, it is easy to make a notch for a right angle. Achieve an angle of 45 degrees will help protractor or a clerical triangle.
It is important to remember that not every house has perfectly flat corners, so you need to adjust such places manually.
To correctly cross out the ceiling, the master will need to perform a few simple steps:
- First, you need to tightly attach the baseboard to the desired corner and draw a line for the trimmer on the ceiling with a pencil.
- Treat the other side of the corner in the same way. The two slats of the skirting board must fit tightly together, leaving no gap.
- The point of contact of the two straight lines is transferred to the baseboard and draw a straight line for the trimmer to the opposite side of the fillet. This is the place of the future cut.
- Do the same procedure with the second baseboard. It is necessary that the lines were perfectly straight. This will help avoid the formation of gaps when gluing.
- It remains to cut off the extra sections of the skirting board with a construction knife and attach the slats to the corner. If both parts fit together well, then you can start gluing. If the baseboard does not line up perfectly, adjust the cut edges with a knife or hacksaw.
The process is easy enough and understandable even without instructional videos. The only rule to adhere to is to measure carefully and use a ruler for accurate marking.
Ready-made fittings are an option for those whose home has perfectly straight corners. Otherwise, the workpieces can not give the desired effect and spoil all the aesthetics. Therefore, before spending on an unsuitable product, you should measure all the corners in the rooms beforehand.
There are also more inventive options for cutting corners of ceiling plinths with wooden bars, cardboard or planks.
Even without special devices and professional tools, you can cut even corners on the baseboard. It is not very difficult and expensive to make help from improvised means.
With proper patience and proper fitting of products, cut the corner of the ceiling plinth with his own hands, like a professional, can even a beginner.
Trimming a baseboard
Trimming with a plier
How to evenly cut the corner of the ceiling plinth with it?
The plier is an uncomplicated tool used by carpenters. With its help, you can cut any workpiece at the desired angle.
It is usually a wooden, metal or plastic tray, which is made to cut at an angle of 45 ° and 90 ° special vertical slots.
There are complicated designs, which in addition to the named angles also have a hole to make a 60-degree cut.
For professional applications a special mitre saw is available. Its swivel mechanism allows you to fix the cutting blade in relation to the workpiece at any given angle.
Inner corner
The prepared skirting board is put against the ceiling, the required length is put aside.
Then the strip is inserted into the joiner exactly as it will be positioned on the ceiling. It must be pressed against the far wall of the device. Hold the skirting board in that position with the left hand.
The blade of the hacksaw should be in such a position that its angle is 45 degrees, and the handle as close as possible to the hand. Trying to avoid exerting pressure on the saw, we carefully cut the workpiece.
Next, at the baseboard you need to cut the response plank. It is also placed at the far wall of the tool, held and pressed, this time, with the right hand.
A similar position to the previous procedure of the hacksaw. its handle is close to the hand at an angle of 45 degrees. The skirting boards are cut.
Then the finished trim strips are joined together. the exact fit is checked. It is believed that for better orientation, when making an inner corner, it is better to start cutting from the front part of the product. The cut areas usually have to be further adjusted with a file.
Outer corner
The right thing to do, in order to observe more accurately the dimensions, first begin to measure the inner corner, and only then move on to the outer.
Otherwise, it may happen that the entire length of the plank is not enough.
The strip is propped against the ceiling, and a notation is made according to its size. Holding the ceiling plinth with the left hand, the ceiling plinth is pressed to the nearest wall, with the handle of the hacksaw close to the hand. The piece is cut off.
The counterstrip is pressed against the nearest wall, holding it in place with the right hand. The blade of the hacksaw should be at a 45° angle, with the handle of the tool close to the hand of the craftsman. A piece of the workpiece is cut, the corner is neatly docked.
This processing of the edge of the details with mash is good in those cases where the angle between the walls is flat and straight (90 °).
If its performance leaves much to be desired, then it is worth using another method.
Marking on the ceiling
Using the ceiling marking method, you can cut a corner accurately and evenly. It has one drawback. it is rather inconvenient to hold the baseboard plank in the balance during the procedure.
Otherwise, using this method, you can mark the angle for cutting even more accurately than other methods.
When the skirting is applied to the intended installation location, all dimensional deviations and inaccuracies are visible and immediately taken into account.
Cutting a corner
First you need to take a pair of blanks, then cut them at right angles. By pressing the end of the slat against a perpendicular wall, we put one slat. Outline on the ceiling line for a trimmer on the contour of the baseboard. Remove the first stone strip and then apply the second one, by pushing its end against the wall. Exactly the same way we mark along the contour of the trimmer line.
The point of intersection of the two separate lines is the point at which the piece is cut. Each skirting board is attached to the surface again, on both marks the point of the future cut. From the point found to the other edge of the skirting board we draw a trimmer line. The skirting boards are cut following the previously made marks, neatly joined, and positioned in the place where they will be installed.
This method allows you to process inside corners more accurately.
How to cut a ceiling plinth correctly. Important trifles
The measurements required to trim the skirting board on the ceiling, should be made in a special way. To determine and mark an inside corner, the length must be measured from the corner itself. To mark an outer corner, it is obligatory to take into account that the baseboard will protrude into the interior of the room at a distance which equals its width.
It is not desirable to fasten the baseboard strips until the exact positioning has been tried on and the mating baseboard has been cut. Only when the two mating strips are perfectly aligned in the corner can they be assembled and fastened. If you are working with polyurethane or wooden skirting boards, you can fix imperfections and flaws with a file or file. To fit the product of foam plastic, you should arm yourself with a sharp knife.
If even after finishing plinths left even a small gap, do not rush to upset. it is not difficult to patch with an ordinary putty. Trimming a ceiling moulding accurately and neatly is not that difficult. But in order to acquire at least a little skill, first try to practice on small workpieces.