How to make a charger for an electric screwdriver
Simple things about complicated. Programs. Iron. Internet. Windows
Batteries are not the same type and have different charging modes. Nickel-cadmium (Ni-Cd) batteries are a very good power source, capable of delivering high power. However, for environmental reasons, their production has been discontinued and they will be found less and less often. Now they’ve been superseded by lithium-ion batteries everywhere.
Lead acid (Pb) gel batteries have very good characteristics, but make the tool heavier, and therefore are not very popular, despite their relative cheapness. Since they are gel (sulfuric acid solution thickened with sodium silicate), there are no plugs in them, the electrolyte does not leak from them, and they can be used in any position. (By the way, nickel-cadmium batteries for electric screwdrivers are also gel batteries.)
Lithium-ion batteries (Li-ion) are now the most promising and most promoted in the technology and on the market. Their peculiarity is a complete sealing of the cell. They have a very high power density, are safe to handle (thanks to the built-in charge controller!), are advantageous for recycling, are the most environmentally friendly, have low weight. In screwdrivers, they are nowadays used very often.
Charger types
Charger for lithium batteries
This section looks at typical electrical circuits. Choose the right battery charger for your electric screwdriver with the following factors in mind:
- battery type;
- number of cells;
- the possibility of careful control of the charging process;
- Availability of skills and knowledge for the quality assembly (adjustment) of a particular design;
- additional requirements for weight, dimensions, other individual criteria.
Analog with built-in power supply
The popularity of such engineering solutions is explained by the comparative simplicity and low cost. The device shown in the following drawing provides a stable voltage to charge a 12 volt block with a sufficiently high current.
Analog charger
Explanation of the circuit diagram:
- The KR142EN microcircuit performs the basic function of stabilization;
- for the given example (for 12V) modification with index “8B” in designation;
- this element is heated, so it is mounted on a metal heat sink with a dissipation area of 20-25 cm square.;
- transformer windings (conductor cross-section) are calculated according to the required output current;
- capacitor C1 removes residual pulsations after rectification by diode bridge;
- The end of the charging cycle is indicated by an extinguished LED (HL1), there is no automatic shutdown.
Analog with external power supply
The circuit diagram in this variant is similar to the considered example. The main difference is the separate design of the rectifier unit:
the charger control unit wiring diagram
This device can be made in miniature. It can be connected to a standard quite powerful rectifier (it is a power supply of a laptop, tablet, other equipment). Explanations for assembly:
- KT 818 transistor has a high power dissipation, so it is mounted on an effective heatsink (area. 35 to 45 sq.m.). see);
- With a tweak resistor adjust the optimal output current, taking into account the characteristics of the battery;
- As in the previous version, the end of the procedure is an extinguished light-emitting diode.
Impulse
The previous devices can restore the functionality of the regular battery of an electric screwdriver in 4-6 hours. The diagram below does the same thing much faster (45 minutes).-1.5 hours). The main advantages are minimal size and lightness.
Pulsed Voltage Storage
This circuit is designed to charge advanced Ni-Cd batteries. They are equipped with a special contact, which is necessary to control the temperature readings. Such a device reproduces an accelerated discharge cycle without additional commands. The user can adjust different combinations of output parameters by jumper settings.
Is mobility important?
Once the battery pack is no longer able to hold a charge, the electric screwdriver becomes a completely useless tool. Buying a new charger is impractical, since it often costs up to 50% of the cost of a new model. That’s why the idea of converting your tool to mains power is a perfectly justified decision.
It is possible to restore the characteristics of the battery, but this option is still a half measure, because in the future the situation will repeat. But before choosing a solution, it is necessary to consider what to do with the mobility of the tool. Is it so necessary? There are 2 potential modifications to the electric screwdriver:
- The tool with an external power supply. In this case, a separate device is made. It is not so terrible, because even a bulky construction can be placed in close proximity to the outlet. But you have to put up with the limitation associated with the length of the power supply cable and the power cord.
- Electric screwdriver with a PSU built in place of the battery. This way of modification will make it possible to avoid assembling a bulky structure, significantly limiting the use of the tool. But in this case, the length of the mains cable can also pose an access problem. But it is possible to use compact devices in such a capacity. They can be a purchased or existing power supply, if they fit the characteristics.
The methods of “revival” of an electric screwdriver are very different. Nevertheless, each of these options finds supporters because they meet the different needs of owners of cordless tools whose operation has suddenly become impossible.
Possible power sources
In order for any electric screwdriver to operate from the mains, it needs a voltage conversion: the tool requires only 12, 16 or 18 volts. All power supplies are divided into 2 large groups: they can be pulsed or transformer.
Impulse systems
In these power supplies, the input voltage is first rectified, then converted into high-frequency pulses. It is fed through a transformer or ordinary resistors. The second method makes it possible to obtain a small-sized design, because the circuit does not have a massive power transformer.
This power supply for an electric screwdriver usually has a relatively high efficiency of up to 98%. The plus side of the solution is the short-circuit protection, the safety that is guaranteed by the no-load lockout. There are disadvantages to switching power supplies. It’s lower power if you compare it to the transformer version. If the lower limit of the load is minimal, such a power supply will not work. Another disadvantage. more difficult to repair in case of failure of a switching power supply.
Transformer Unit
It is a classic device. A linear power supply includes a step-down transformer and a rectifier that turns alternating current into direct current. The last element comes in two kinds. a single half-periodic, consisting of a single diode, or a double half-periodic, consisting of a diode bridge assembled from 4 electronic devices.
The circuit of the transformer unit may include a capacitor, stabilizer, high-frequency filter and short-circuit protection. The advantages of the device: simplicity, reliability, maintainability, absence of interference, and very expensive elements. Disadvantages. large size and the same weight, low efficiency. Since part of the voltage is taken by the regulator, the output value must be higher than that required for the electric screwdriver. For example, for a tool with a 12 V power supply you need a PSU, which has an output voltage of 12 to 14 volts.
How to make a charger for an electric screwdriver
All cordless screwdrivers are equipped with battery chargers. However, some of them are very slow to charge the battery, which in intensive use of the tool creates certain inconveniences. In this case, even the two batteries included in the kit do not allow you to set up a normal duty cycle. The best way out of this situation will be a battery charger for an electric screwdriver, made with their own hands, according to the most suitable scheme.
The electric screwdriver device
Despite the variety of models, the general device of screwdrivers is quite universal, and the principle of operation is almost the same. They may differ only in appearance, the layout of individual parts, the presence or absence of additional functions.
The screwdrivers can be powered by a 220 V mains supply or by batteries. The general design of an electric screwdriver includes the following elements and components:
- Housing. Made of hard plastics to reduce weight and production costs. Some models use metal alloys, giving the construction greater durability. Consists of a pistol with a comfortable grip and disassembles into two halves.
- Shotgun cartridge. The bits are fastened in it and the rotary motion is transferred to them. Usually uses a three-jaw, self-clamping and self-centering device. Contains a hexagonal recess in which the shank of the bit is inserted. To fix the nozzles are inserted between the cams and clamped by rotating the sleeve.
- Electrical part. It consists of a small-sized electric motor of the collector type. The mains-powered devices use two-phase AC motors rated at 220 V. They are started by a starting capacitor. Cordless screwdrivers use DC motors. DC current is supplied by a battery made in the form of a set of elements combined in a common enclosure. The power of an electric screwdriver is determined by the output voltage of the battery.
- Circuit elements. A special button, located on the handle, is used to turn it on. Push-button switches usually work together with voltage regulators. That is, the amount of voltage supplied to the motor depends on the force exerted when the button is pressed. Here is also installed a switch lever, which provides reverse rotation of the shaft by reversing the polarity of the electrical signal. The signal from the button goes directly to the rotor through the collector. The electrical contact is ensured by graphite brushes of defined sizes.
- Mechanical parts and components. The basis of the construction is the planetary gearbox by means of which the torque is transmitted from the shaft to the output spindle. Driver, ring gear and satellites are used as additional parts. All parts are located inside the housing and work together in turn.
An important component is the torque control clutch, which sets a defined torque. It stops the shaft rotation after screwing in. Stopping occurs because of increased resistance to rotation. This measure prevents the screw threads from coming loose and damaging the electric screwdriver itself.
Screwdriver charger diagrams
In the same screwdrivers can use different types of batteries, with different parameters and specifications. Because of this they require different battery chargers. Therefore, before you buy or make a charger for an electric screwdriver with your own hands, you need to determine the type of battery and operating conditions. In addition it is recommended that you investigate the basic circuitry most commonly used in battery chargers.
Charger on a microcontroller. Placed in a regular case, it is equipped with sound and light signaling of the beginning and end of charging. This circuit ensures the correct charging of the battery. At the beginning of the operation the LED’s light up and then go out. The indication is accompanied by a sound signal. This is the way to test the operability of the device. The red light-emitting diode then flashes steadily, indicating that charging is proceeding normally.
When the battery reaches full charge, the red LED stops flashing, and instead turns green accompanied by a sound signal. This indicates that charging is complete.
The voltage level that should be at full charge is set by means of a variable resistor. In this case the value of the input voltage is equal to the voltage of a fully charged battery plus one volt. The circuit uses any field effect transistor with a P-channel and the most suitable current characteristic.
In order to provide charging at 14V, the voltage applied to the input should be at least 15-16V. The threshold for disconnecting the charger is set using a variable resistor at 14.4V. The actual charging process takes place in the form of pulses which are displayed on the LED. In between the pulses the battery voltage is monitored and when the correct value is reached an acoustic signal is emitted together with the blinking of the LED indicating the end of the charge.
There are other schemes of chargers. For example, the charger for a power drill, electric screwdriver works with a voltage of 18 volts. When charging a 14.4V battery, the charging current is adjusted with a resistor.
Charger for an electric screwdriver with my own hands
The problem of making your own charger does not arise so often, in connection with the large number of options that are suitable for almost all models of screwdrivers. Just sometimes there are situations when the charger is missing, or it suddenly broke down, and there is no possibility to buy a new one. In this case you can try to make the charger yourself.
All necessary materials should be supplied in advance. You will need a battery in a non-operational state, a glass from the battery, a soldering iron, a thermal gun, an ordinary Phillips screwdriver, a drill and a sharp knife with replaceable blades. After that you can start building the charger. In the first place, the charging cup is opened, then all the conductors are unsoldered from the terminals. The next step is to remove the internal electronics. When performing this operation it is necessary to observe the polarity of the terminals, so as to avoid confusion and errors in the future.
Electric screwdriver charging device
No repair job is complete without a drill. This electrical device is powered from the mains or battery. If a cordless drill is chosen for the work, it will also need a battery charger. It is sold in a set with the device. However, even such an element sooner or later fails. To avoid an unfortunate circumstance, you should study the design features and description of the charger. Especially worth getting acquainted with the circuit diagram of the battery charger of a drill-electric screwdriver. It will help to know how to properly repair it.
Types of chargers
There are many kinds of battery chargers for cordless drills. They differ in price, principle of operation and peculiarities of repair. Each type of screwdriver should be considered in more detail.
Analog devices with a built-in power supply
Such devices are quite popular because of their low cost. If the drill will not be used for professional purposes, you should not emphasize the duration of operation. The main condition to be met by the simplest battery charger is that it must provide a sufficient current load to charge the battery of an electric screwdriver.
Important! To begin charging, the voltage at the output of the power supply must be higher than the battery rating of the appliance.
The operation of an analog device with a power supply is quite simple. Such charger is used as a stabilizer. As an example, consider the circuit of a battery charger for 9 to 11V. It does not matter what type of battery is used. Cordless screwdriver drills are quite common among home craftsmen, so knowledge of the peculiarities of their repair will come in handy for everyone.
Many craftsmen at home build such a power supply with their own hands. The circuit can only be soldered onto a universal board. To ensure heat dissipation, the microcircuits of the regulator, it is necessary to find a heatsink of copper 20 sq.m. see square.
Warning! Stabilizers are operated by the compensation principle. Excess energy can be dissipated in the form of heat.
Thanks to the output transformer lowers the AC voltage from 220 V to 20 V. To calculate the power of the transformer you can use the voltage at the output of the battery charger. Rectifying the alternating current is done by a diode bridge.
After rectification the current appears to be pulsating. However, this peculiarity of current has a negative effect on the functioning of the circuit. The ripples can be smoothed out with a filter capacitor (C1). A KR 142EN microcircuit is used as a regulator. Radio amateurs call it a “krenka”. To get 12 volts you need a chip with index 8B. The control is built on transistor VT2. Also the trim resistors are used. Automation is not installed on such devices. How long the battery will charge depends on the user. To control the charge a fairly simple circuit is assembled on the transistor VT1. The circuit also includes a diode VD2. When the charging voltage is reached, the indicator fades.
The more modern systems have a commutator. It shuts down the voltage at the end of the charge. If you buy a cheap electric screwdriver it comes with a simple battery charger. This explains why these devices break down so often. When buying such an electric screwdriver, the consumer risks being left with a new, but non-working device. However, the battery charger is easy to assemble with your own hands. The main thing is to have a diagram.
Homemade device can last much longer than the bought. To pick up the value of the battery of a power drill, you will need to experimentally adjust the transformer and stabilizer.
Analog devices with external power supply
The circuit of the charger itself is quite simple. With such a device comes a power supply and a charger. There is no point in examining the power supply unit. Its circuit is characterized by a standard design. It includes a diode bridge, transformer, rectifier and capacitor filter. Usually it has an 18V output.
It is controlled by a small board that is the size of a matchbox. Such assemblies have no heat sink system. For this reason such devices fail quickly. Therefore, users often wonder how to charge a cordless electric screwdriver drill without a charger.
This problem can be solved quite easily:
- One of the main conditions is the availability of a power supply. If the “native” unit works properly, you can create a simple control circuit. If the whole set is broken, a power supply from a laptop computer can be used. The necessary 18 volts are obtained at the output. Such source can have enough power for any battery.
- A second prerequisite is knowing how to assemble circuit diagrams. Parts are usually soldered from old household appliances. In addition, most of them are sold at flea markets.
The control unit must have a circuit like the one on
Unreliability of Chinese batteries can be explained by the economy of manufacturers “in matches. To set an accurate charge current you should have a 1 Kohm resistor. A 4.7 ohm resistor is installed at the output. It must also provide enough heat dissipation. The output power is less than 5W.
The assembled circuit is quite simply placed in the case of a standard charger. The radiator does not have to be removed. The main thing is that there must be sufficient air circulation inside the housing. The power pack from a laptop computer is still used for its intended purpose.
Battery varieties
The charger for an electric screwdriver is created taking into account the peculiarities of an autonomous power source. The following sections describe popular battery packs. When examining the compatibility of the functional components of an electric screwdriver, it is advisable to pay particular attention to charge recovery modes.
Nickel-Cadmium
Lithium battery charger
These batteries are different:
Unfortunately, big problems arise at the disposal stage. Harmful chemical compounds in Ni-Cd batteries are very harmful to the environment. For this reason, the use of such products is being phased out in many countries.
Unless otherwise specified by the manufacturer, select the operating mode together with the appropriate charger circuit for the electric screwdriver according to the following data:
- To extend battery life, we recommend “training” of 2 to 6 full cycles before initial use and every 6 to 8 months thereafter;
- long-term storage in discharged condition is permissible;
- Pre-discharge voltage 0.9 to 1 V;
- The nominal capacity is retained only at positive temperature;
- the overheating during the recovery process is not permissible (not more than 40°C)
- The end of the cycle is indicated by a slight decrease in voltage;
- The charging current is calculated using the formula
Important! The letter “C” denotes the capacity given in the battery datasheet. If C=2.5 Ah, a charge with a current of 5A = 22.5.
Sulfuric acid batteries for an electric screwdriver
Products in this category are created on the basis of lead cells with an acid gel electrolyte. Advantages:
The main disadvantages of sulfuric acid batteries are their considerable size and heavy weight. Cells are charged at 1.8-2 V while maintaining a current of 0.1-0.15C.
Lithium-ion batteries for electric screwdriver
It is the most common modern solution. Similarly designed batteries are used in smartphones and notebooks, other consumer and professional equipment. Pros:
- Better performance, in comparison with the above-mentioned analogues in terms of energy storage per unit volume (weight);
- wide operating temperature range;
- long-term maintenance of good operating parameters
- No excessive disposal requirements.
One standard cell is charged at 3.6V to 4.2V. Exceeding the threshold set by the manufacturer shortens service life. Low level limits storage capability. Batteries are restored to their energy potential with careful temperature control.
Charging features for different types of batteries
There are several types of batteries used in electric screwdrivers. nickel-metal hydride, nickel cadmium and lithium ion. Each has unique features, and charging is done in accordance with the recommendations for this type.
Nickel-cadmium
The most popular type of battery, its advantages are compact size, low cost and high capacity. Can withstand over a thousand recharging cycles, depending on the quality of materials used in their manufacture, and compliance with the conditions of use.
This type of battery has a significant disadvantage. the memory effect. If you interrupt their charging before the end, the battery capacity will decrease over time. In addition, their production is very toxic, so some European countries have abandoned their use.
Nickel-metal hydride
These batteries represent a new generation of the previous type, their production and operation are practically completely safe for the environment. They have a much smaller memory effect. Have a significant disadvantage. high self-charging current. Batteries of this type should be kept fully charged, and if they are not used for 30 days, it is recommended to restore their capacity.
Li-ion
Batteries of this type are considered the best. Charge quickly, have no memory effect. Such batteries do not need to be completely discharged, and it is allowed to connect them to power as needed. The disadvantages are high cost, as well as a fear of low temperatures.
Li-ion batteries of an electric screwdriver should be properly charged at the temperature of 10 to 40°C, and if they get hot during this process, they should be cooled to prevent breakage.
Schematic diagram for an 18 volt electric screwdriver
In this type of charger there are transistors of transient type only. The introduction of transceivers to increase the conductivity of current are engaged in companies such as “Interskol”. The strength of the current in the products sometimes reaches 6A. The figure below. the scheme of the charger for an electric screwdriver voltage of 18 volts.
The following elements and features are present in the circuit:
Chromatic resistors are used when it is necessary to increase the current conductivity of the device. The initial value is 5.4 µ.
How to make a battery charger for an electric screwdriver with your own hands
There are many options for converting a power supply from other tools and appliances. It is also possible to create printed circuit boards from scratch, but this process is very long, also it requires professional radio engineering skills and knowledge. In order to make a charger for an electric screwdriver of different voltages with your own hands, you need to determine its general parameters. It is important to specify the type of battery and build a proper charger. The main parameter is the type of electrical circuit. They are commonly divided into the following categories:
After selecting a convenient option, the general instructions are as follows:
- Create a printed circuit board, taking into account the space available in the case.
- Drill holes for ventilation so that the transistors and microcircuits are sufficiently cooled.
- Assemble the circuit.
Special attention should be paid to the transformer. Its power must not exceed 250-300W and its current must be 15A or more. To assemble a diode bridge, you need to find the appropriate high-power diodes in the reference book.
The battery charger schematic below is universal. The battery receives the necessary current to the voltage of 12, 14 and 18 volts.
This circuit is built on VT2. It is a two bipolar transistor. It is powered by a bridge. The transistor is connected by tracks to the current value converter, a step-down transformer. The latter provides a voltage that is sufficient to power the battery.
The T1 transformer has a high power without overheating. The windings are not subject to additional load even in continuous operation. The intensity of the charge is controlled by the resistor R1, which operates with the battery switched on. The current is constant, and the transformer voltage fluctuates at 24 V. The maximum current is limited by the resistor R3.
VD6 indicates the presence of charge and remains lit until the process is complete. VD6 switches off at the end of the charge, the LED light diminishes gradually.
Important! When using a homemade charger, you need to regulate and control the voltage, temperature of the lithium-ion battery.
Foil-coated textolite is the material of the board on which all the electronic parts in the circuit are mounted. You can replace the diodes by other ones, for example KD202, D242. It can be found in old Russian-made electrical appliances.
The main rule for the layout of the radio cells on the board is to minimize the number of junctions. When assembling it is enough to have a middle density between the parts. Leave 3-5 mm distance between them for easy unsoldering. Assemble them in a convenient self-made case, but if you do not have enough knowledge for that, it is easier to take a faulty charger and rebuild it. For this you need:
- Rectifier diode 1N4001 to the position VD1-VD4.
- Diode at position VD5.
- LED for position VD6.
- Capacitor C1-C2 K50-35 220-1000 mF from 50 volts.
- Wire resistor on position R1, 10 kohm.
- 0.25 MLT resistor on position R2. Resistance is 330 ohms.
- MLT-2 resistor on R3. Resistance 1 Ohm.
- KT361B transistor.
- KT829B transistor. The radiator should be about 20-50 cm square. 2
- Power transformer for 220/24V.
- Determine the dimensions of the board that will fit.
- Mark the tracks with nitro paint according to the diagram.
- Desolder the radio elements and treat them in a copper sulfate solution.
- Install the aluminum plate, on which the transistor KT829B will be mounted together with the heat sink.
- Screw the transistor to the plate tightly.
- Solder the terminals without disturbing the polarity and complete the board assembly.
- Put the board in the case.
- Lead the wires through which the connection to the transformer will be established.
- The case in which the transformer will be placed, provide a connector. The charging block will then be placed in it. PC power supply connectors will do.
- Put transformer in the case.
The aluminum plate and transistor should not touch the circuit. After assembly, you need to see how the finished battery charger for an electric screwdriver works.
If the electric screwdriver has a non-original power supply that was assembled separately from the case, you need to provide cooling. After completing the assembly process, check the supply voltage in the unit.
The number of turns is reduced if the voltage jumps above the desired value. If it is lower than necessary, the “secondary” is wired. It must be of the same cross section. When start-up occurs, the amperage of the rated current increases several times. The PSU will begin to heat up and the elements of both devices will fail if there is no cooling.
Temporary charging for an electric screwdriver with their own hands
If the charger suddenly failed and there are no suitable radio components on hand, you can make a temporary device. It will not work for long, but it will be enough for several charges. The recovery rate of the battery will be slower than with the store battery charger. Beforehand, you need to prepare the following materials and tools:
- a battery (unwanted, non-working battery);
- battery pack;
- gun with hot melt glue;
- Phillips screwdriver;
- drill;
- sharpened knife.
The step-by-step instructions are as follows:
When it is necessary?
There are situations where an electric screwdriver charger is not available. For example, it can fail, which may cause the work stoppage. In addition, the charger can be lost. The third reason is elementary burnout and wear of the charger, as well as unbending of the terminals in the battery itself, which causes loss of contact. To eliminate the problem, you have to look for suitable options for charging that will be compatible with the existing model of electric screwdriver. In this case, it is preferable to buy the right charger, which will promote safe operation and fully charge the battery of the tool.
How to repair the battery of an electric screwdriver
There are a lot of videos on the Internet that, for example, clearly show the battery recovery of a Hitachi electric screwdriver with the Imax B6. It consists in “reanimating” nickel batteries by applying high currents. Proponents of the express method of restoration suggest to revive the battery using the simple settings of Imax B6. You set the mode to nickel-cadmium, and the battery can be resuscitated in that mode.
But heating with impulse current and then charging are quite risky methods for nickel-cadmium batteries. The broken connection in the cell cannot be restored by high currents. over, if there is little or no electrolyte in the battery, the high currents will finally “kill” the battery. Therefore, in order to prevent irreversible damage to the batteries, it is recommended first to refill them with distilled water and only then charge them with Imax B6.
Whether you can use the pulse current method is up to the battery owner. There are many videos on the internet about how to recharge a Ni Cd battery from an electric screwdriver. But there is an opinion that in reality the fast methods work for a very short time. For example, if the electrolyte inside any of the batteries from the bundle has boiled out, or dried out, the pulse current will “kill” the cell permanently.
If possible, you can carefully disassemble each nickel-cadmium battery and see in what state the electrolyte is. If it appears to be dry, you may use the method of adding a small amount of distilled water through the syringe.
Restoring with water
In order to drill a neat hole in the battery, you will need a small drill bit. The hole should be made away from the center, preferably in the upper side of the cell, where there is a small depression. Then fill the battery with distilled water using a syringe to the last.
After that, the battery can be fully charged Imax B6 and let it “stand”. It is a long procedure. Restoring 8-, 12-, 14-cell “batteries”, depending on the voltage, can take a long time. Ideally, you should not charge them immediately, but let the “jars” of water stand for a day. One by one to charge the batteries can not, it is better that they were at least three or four in a bundle, for an even distribution of voltage.
Short-term impulses of current through a resistor of 40 ohms to 12 volts should be given after the reanimated cell has been filled with water, and not “dry” as it is often done.
After the batteries have stood for a day, you can begin charging them. Do not close the holes yet. Connect to Imax for the device to “see” them. Charge it and let it “settle” again. If any one battery has not recovered. Find the weak cell in the bundle with a multimeter and pour water into it again.
The main point of this scrupulous method of repairing the battery of an electric screwdriver is to restore the connection between the plates of the batteries and their contact-transition buses (the internal structure of Ni-Cd is similar to the scheme used to make solar batteries). The main reason the batteries stop working is the delamination of the plus contact from their inner part.
Do not cover the holes drilled in the batteries until the battery charge is stable. Once the charge has stabilized, the holes are gently sealed with silicone. Water can be refilled periodically at any time.
As has already become clear, this method is not intended for the lazy and for those who do not want to delve into the intricacies of electronics. However, the method with distilled water helps to save a lot of money and is the answer to the question of how to restore the battery of an electric screwdriver by the most gentle method. Usually a screwdriver comes with two batteries. One can be used, and the other can be gradually restored. This method, despite its duration, seems more humane and safe for the battery.
How to make your own hands a power supply for an electric screwdriver 18V: how to remake with power from the mains
The main advantage of a cordless electric screwdriver is autonomy. It is true that all batteries lose their charge after a while. This makes it more difficult to use the tool, because after a few screws screwed, the battery is completely discharged.
Of course, you can just buy a new battery, but in most cases it costs so much that you begin to think about buying an electric screwdriver. The best way out would be to convert a single battery (usually comes with several batteries) into a power supply. You can work with both battery and mains power.
Preparatory step
Before proceeding with the remodel, you must first find a suitable sized mains power supply for an electric screwdriver. It is desirable that it can fit into the battery case.
In addition, you should remove all fillings from the case, and measure its internal space, because the dimensions on the outside and inside can be different.
After that, you should study the markings or instructions on the body of the tool to find out the supply voltage. Then you will have to independently calculate the current consumption of an electric screwdriver, because manufacturers do not indicate such a parameter anywhere. True, you need to know the power.
To avoid the calculations you can pick up a power supply by eye. When buying, pay attention not only to the current of the charger, but also to the battery capacity. For example, if the capacity is 1.2 ampere-hours, and the charge is 2.5, then the generated current should be approximately between these figures.
In addition, before looking for a suitable power supply, you should first write down the following on paper:
Some tips on choosing
The power supply for your electric screwdriver must be reliable, convenient, lightweight and small in size. Even when buying such a tool, you should pay attention to the falling load characteristic. In the case of overloading it will help to avoid damage to the tool. It is also important to pay attention to the availability of parts and the simple design.
It is better to choose a switching power supply unit, as it is more compact and lighter than a transformer one. But Chinese models are often marked with greatly inflated characteristics. You can use Soviet power supplies. However, these are too low in efficiency and too big in size.
We recommend looking for this device at hobbyist and junk markets. When buying it, immediately discuss with the seller the possibility of return. Be sure to test the power supply at home. To do this, connect it to the tool, and try to tighten a few screws.
How to Rebuild an Electric Screwdriver
Once you have purchased and tested the power supply you must disassemble it. It is good if the body is fastened with screws and not glued. In the latter case, you need a hammer to tap the entire perimeter of the joint. There should be no problem. If you have problems take the knife and put it with the tip down and tap gently on the handle. The case will begin to separate for sure.
Next, with a soldering iron the leads and cord are separated from the plug. In the place where the battery was, you need to place the contents of the case. Then through the hole in it the cord for mains operation is led out and soldered to the power unit. Connect its output to the terminals, observing the polarity. It remains only to assemble the case and connect the power supply to the screwdriver for testing.
By the way, if the battery case does not match the dimensions of the power supply unit, then you have to build into the handle of the device suitable socket.
To prevent the voltage from going to the battery while the tool is running, you should connect the unit in parallel with the power leads and put a diode of the required power in the gap of the plus wire. It must be installed with the minus side of the motor.
Using a car battery
It can be an excellent alternative to connecting an electric screwdriver, especially when the work is carried out away from the power grid. To do this, simply disconnect the clamps from the tool and connect them to the battery. Of course, it should not be used in this mode for a long time.
Creating a transformer coil
There is another method of upgrading the device into a network device. It consists in making a portable power supply. The screwdriver is connected with a flexible cable that has a plug on the other side.
True, you will have to make a separate power supply or use a ready-made transformer, which is equipped with a rectifier. Suitable any, the main thing that its characteristics coincide with the parameters of the tool.
It will be difficult for an inexperienced person to make transformer coils with his own hands. In addition, you can easily make a mistake in the number of turns and the choice of wire diameter, so do not do it. There is a lot of unnecessary modern equipment, which is already equipped with the necessary transformer. It is only necessary to choose a suitable one and create a rectifier for it.
To solder the rectifier bridge, semiconductor diodes are used. It is important that their parameters coincide with the device.
Another method of altering the electric screwdriver
What to do if you need to carry out repair and construction work on the roof or the street? In this situation, replace the battery with a more powerful. Batteries from any old appliances will do. For example, you can use a dead laptop lithium battery at 2200 amps.
The first thing to do is to disassemble the body of the device to remove the old battery. The wiring from the new battery is connected to the old battery, observing the polarity. This is done using a soldering iron. After that the tool should be turned on to check the operation. The charging port is inserted through the opening in the housing, and the plug is inserted. An electric screwdriver can be charged like a laptop.
The battery itself is attached with hot melt adhesive. Then the body of the device is assembled.
Tips for using an electric screwdriver
Home craftsmen who have been able to convert their tool into a power tool, must follow a few rules when using it:
Converting electric screwdriver charger into a lead battery charger. Dexter 45W
For the last 2 years I have two chargers lying around without use. One charger from a Makita DC1414 electric screwdriver, which I will tell you about later. Second charger from Dexter electric screwdriver. Dexter electric screwdriver itself is broken (by the way, maybe someone has an extra button, I can not find the button. We do not sell them), but the charger from it is able to deliver at 12.3V 45W power that at 14.4V is about 3A. According to the idea should not be a bad charger for charging lead car batteries.
Without thinking twice, I disassembled the charger, removed the board and found that the power supply is assembled on a very well-known PWM 3842 or 3845. The protection of the charger is assembled as follows. The power supply has a current shunt that limits the current in the primary winding, thereby limiting the maximum output power. Stabilization of output voltage is done with optocoupler, connected through Tl431 with 2,5V divider and additional control from the processor on the 1st leg of TL431 through diode 1n4148 and 10 kOhm resistor.
Power to the rechargeable LI-ION batteries was supplied via a protection relay with a transistor stage controlled by a processor. Along the minus line is the current shunt, to control the current of the batteries being charged. It has an op-amp LM324, to amplify the voltage of the shunt, to amplify the voltage from the thermistor, and then I did not understand. There was also a “brain” that is a processor who monitored the battery voltage and controlled the entire circuit.
What you need for rewiring
In addition to an electric screwdriver and a power supply, you will also need a wire:
- soldering iron
- solder and flux;
- multimeter;
- Several wires with a cross section of 2.5 mm or more;
- insulation tape;
- A sharp knife, chisel, or scalpel.
You also need a minimum knowledge of electronics, the ability to use a tester and soldering iron.
A cable to connect an electric screwdriver to the mains
Wire can be taken and thinner than 2.5 mm 2. if the tool is not to be used for extended periods of time. Otherwise, overheating of the cable, melting of contacts, followed by a short circuit is possible. On the length of the wire depends on the voltage drop, so do not
Using a wire longer than 3-4 meters is not recommended because of the voltage drop. Maneuverability and portability of the tool will increase the use of an extension cord. Do not twist a couple or more pieces of wire, especially ones with different cross sections, made of different materials. This approach lowers the current parameters. at the twisting points, the resistance increases.
Power supply capacity for an electric screwdriver
The calculation of the electric motor power consumption of an electric screwdriver has been known since school. Multiply the current consumption of the motor by the applied voltage. For example, if the battery indicates: 3 Ah and 18 V, you need a power supply that delivers at least the current with the appropriate parameters. These values are relevant for no-load operation.
For the normal operation of the motor under load, a margin of about 30% is necessary. Otherwise, there is not enough power to screw fasteners, with a huge reserve, the battery may fail.
The parameters of the battery are indicated on its case
Also for your information! The current strength of household tools reaches 3-4A, professional tools can exceed a dozen amps. The voltage is 12, 14 or 18 V. All parameters are indicated on the case of the battery, in the instruction manual, data sheet or on the official website of the manufacturer and vary for different models.
How to convert an electric screwdriver to work from a household network
Let’s consider accessible variants of updating the tool with which people who are somehow familiar with electronics, can hold a soldering iron in hands and to measure voltage with the multimeter are capable to cope.
Standard battery charger
You can not connect an electric screwdriver for power via the battery charger. Charger is designed to power the battery, and its current is lower than the battery output. Therefore, the motor will rotate slowly, will develop tens of percent of the original power due to the lack of supply current. An attempt to stop the rotation of the screwdriver chuck or screwing fasteners will lead to a sharp increase in current: from 1.2-2 A to 6-20 A, operating the device at the limit of possibilities.
Charging from a laptop to power an electric screwdriver
The easiest way to power an electric screwdriver from a 220 V mains supply. Laptop battery chargers give out 12-19 V. It is imperative that you evaluate the power reserves. For example, a 19-volt battery with 3.2 amps will be too much for a 12-volt motor with a load of 1.3 amps.
Instructions are the simplest. In the absence of a soldering iron you can get by with twisting wires, although it is recommended not to do that.
Important! The remaining battery banks should be left in the battery case, they perform the role of a balancer. Without cells, the screwdriver is uncomfortable to hold, even with two hands. it will lean toward the chuck.
Computer power supply instead of the battery of an electric screwdriver
Most surplus, but working ATX form factor power supplies are capable of powering an electric screwdriver motor. At the beginning, rough calculations are made. The starting current of a 12 V battery is 18 A. You need 216 Watts of power to start the motor. you need a 220-240 watt power supply. In an hour, it can be reworked with a soldering iron and measuring tools.
The computer PSU solution has a couple of drawbacks:
- The electronics will not fit into the battery case of an electric screwdriver, the stuffing will have to be left in the metal housing of the power supply.
- The design is sensitive to dust, and when repairing the power supply will have to be protected separately from small debris, without interfering with cooling.
- The device will add a noticeable amount of weight.
Before modifying it is worth checking that the solution works and is reliable.
- The case of the power supply is disassembled with a Phillips screwdriver.
- The green wire in the output stub is shorted to any black wire in the same bundle.
- Connect the device to the mains.
- Use a tester to measure the potential difference between the yellow and black conductors of the bundle.
If it’s 12 volts with only minor fluctuations, it’s okay.
- The plug is cut off.
- Yellow and black wires are connected in parallel 3-4 pieces. twisted.
- The green trigger wire is shorted to the black one.
The result is a 12-volt DC power supply with a decent current load.
Sometimes at low speeds. the start button is not pressed completely, the circuit is unstable: the power supply is switched off. the protection is triggered.
You can turn off and on PSU or include LC-filter in the circuit. It will smooth out the interference that occurs between the PWM controllers of the motor start button and the power supply.
In practice, the picture is different. three capacitors, a resistor and an improvised coil.
To increase the convenience of operation, the device must be intelligently assembled, so that nothing was hanging, and the tool was convenient to use.
- The battery is disassembled and all components are removed from the case.
- Together they mount an LC-filter.
- From the power supply cut off unnecessary output wires, all but the green if the PSU will only be used to power an electric screwdriver.
- It is soldered to the black connector on the same connector.
- Short pieces of copper cable are soldered to the common conductor and the 12 V wire.
- Connect to the cord that leads to the plug through the terminal.
Now you need to assemble the case and test the operation of the device.
Important! The length of the wire should not exceed 1.5-2 meters. If you use a longer cable, the percentage of energy dissipation will increase
It allows you to quickly turn a cordless electric screwdriver back into a cordless screwdriver after you buy the battery.
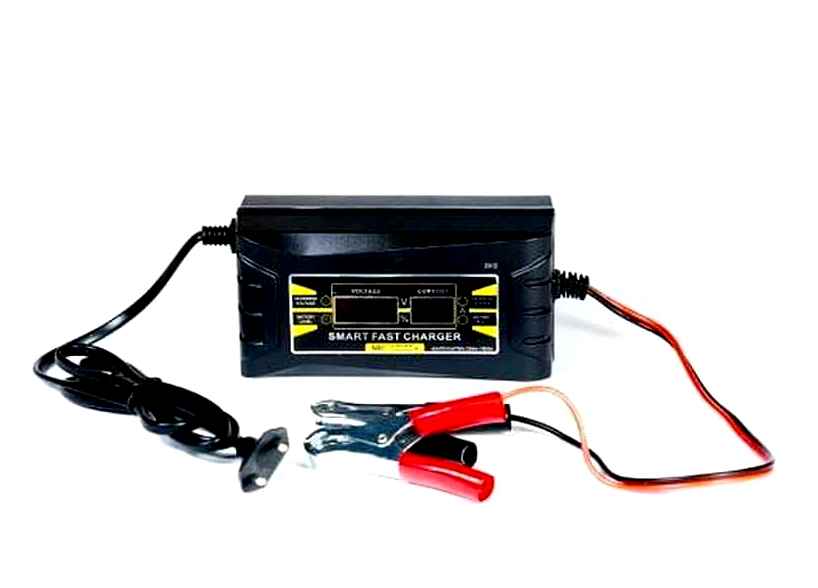
Power an electric screwdriver from a car battery charger
Alternatively, it is also possible to use the battery charger for automotive and other batteries as a secondary power source for the electric motor of an electric screwdriver. Usually they are adjustable, with the function of switching the voltage and current output. Car chargers are chosen based on the specified battery of an electric screwdriver plus ~ 30%.
For connection, the charging terminals are connected to the battery terminals of the electric screwdriver, observing the polarity. It is wise to solder pieces of wire to the pins of the tool, and connect the other ends to the alligator clips of the battery charger.
How the electric screwdriver works with a car battery
Powering an electric screwdriver with a car battery
The electric motor of the tool can be powered by the battery of the tractor, car and other equipment, where there is a voltage regulator.
- As is the case with the car battery charger, two conductors are soldered to the terminals of the electric screwdriver, such as spare wires with crocodiles cut off.
- Other ends of wires are stripped by 3-5 cm, bent by hooks and fixed to the battery terminals, for example, clamped by nuts or clamps.
- After setting the correct parameters of current it’s possible to work. Remember to observe the polarity.
Chinese power supply board as a power source for an electric screwdriver
We will talk about an adapter with a voltage of 24 and a current of 9 A. enough for powerful screwdrivers that require a voltage of 18 V. You can purchase the board in electronics stores, as well as order it directly from China. Let’s look at an example of a popular model.
First of all a constant resistor is replaced with a variable one. a regulating resistor.